A Visual and Overly Simplified Guide to The AdaBoost Algorithm
A step-by-step explanation you always wanted to read.
AdaBoost (and other boosting models) are incredibly powerful machine learning models.
The following visual from an earlier post depicts how they work:
As depicted above:
Boosting is an iterative training process.
The subsequent model puts more focus on misclassified samples from the previous model
The final prediction is a weighted combination of all predictions
However, many find it difficult to understand how this model is precisely trained and how instances are reweighed for subsequent models.
Today, let’s understand how AdaBoost works entirely visually.
The idea behind Adaboost is to train many weak learners to build a more powerful model. This technique is also called ensembling.
Specifically talking about Adaboost, the weak classifiers progressively learn from the previous model’s mistakes, creating a powerful model when considered as a whole.
These weak learners are usually decision trees.
Let me make it more clear by implementing AdaBoost using the DecisionTreeClassifier class from sklearn.
Consider we have the following classification dataset:
To begin, every row has an equal weight, and it is equal to (1/n), where n is the number of training instances.
Step 1: Train a weak learner
In Adaboost, every decision tree has a unit depth, and they are also called stumps.
Thus, we define DecisionTreeClassifier with a max_depth of 1, and train it on the above dataset.
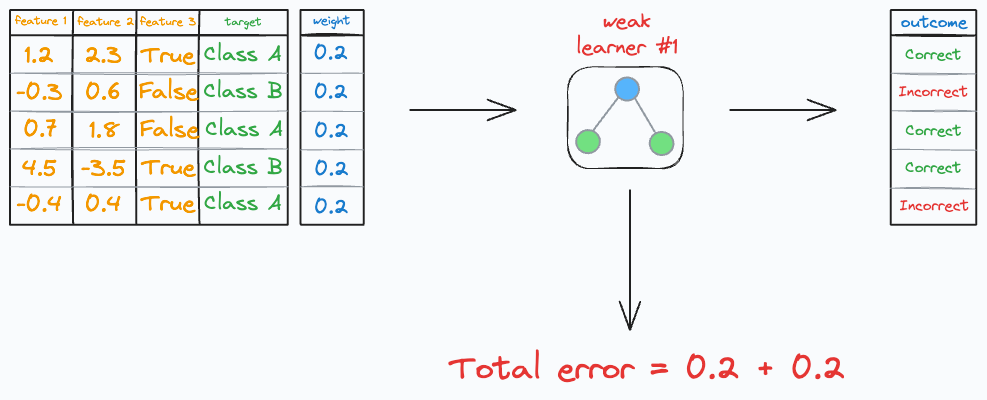
Step 2: Calculate the learner’s cost
Of course, there will be some correct and incorrect predictions.
The total cost (or error/loss) of this specific weak learner is the sum of the weights of the incorrect predictions.
In our case, we have two errors, so the total error is:
Now, as discussed above, the idea is to let the weak learn progressively learn from previous learner’s mistakes.
So, going ahead, we want the subsequent model to focus more on the incorrect predictions produced earlier.
Here’s how we do this:
Step 3: Calculate the learner’s importance
First, we determine the importance of the weak learner.
Quite intuitively, we want the importance to be inversely related to the above error.
If the weak learner has a high error, it must have a lower importance.
If the weak learner has a low error, it must have a higher importance.
One choice is the following function:
Do note that this choice of function is quite arbitrary and has no specific origin.
It’s just that this function happens to fulfill all our requirements:
Defined only between [0,1].
When the error is high (~1), this means there were no correct predictions → this gives a high negative importance to the weak learner.
When the error is low (~0), this means there were no incorrect predictions → this gives a high importance to the weak learner.
Of course, if you feel there could be a better function to use here, you are free to use that and call it your own Boosting algorithm.
In a similar fashion, we can create our own Bagging algorithm too, which we discussed here.
Now, we have the importance of the learner.
The importance value is used during model inference to weigh the predictions from the weak learners.
The next step is to…
Step 4: Reweigh the training instances
All the incorrect predictions are reweighed as follows:
And all the correct predictions are reweighed as follows:
Once done, we normalize the new weights to add up to one.
That’s it!
Step 5: Sample from reweighed dataset
From step 4, we have the reweighed dataset.
We sample instances from this dataset in proportion to the new weights to create a new dataset.
Next, go back to step 1 — Train the next weak learner.
And repeat the above process over and over for some pre-defined max iterations.
That’s how we build the AdaBoost model.
See, it wasn’t that difficult to understand Adaboost, was it?
All we have to do is consider the errors from the previous model, reweigh it for the next model, and repeat.
I hope that helped!
👉 Over to you: Now that you understand the algorithm, go ahead today and try implementing this as an exercise. Only use the DecisionTreeClassifier class from sklearn and follow the steps discussed here. Let me know if you face any difficulties.
👉 If you liked this post, don’t forget to leave a like ❤️. It helps more people discover this newsletter on Substack and tells me that you appreciate reading these daily insights.
The button is located towards the bottom of this email.
Thanks for reading!
Latest full articles
If you’re not a full subscriber, here’s what you missed last month:
Federated Learning: A Critical Step Towards Privacy-Preserving Machine Learning
You Cannot Build Large Data Projects Until You Learn Data Version Control!
Why Bagging is So Ridiculously Effective At Variance Reduction?
Sklearn Models are Not Deployment Friendly! Supercharge Them With Tensor Computations.
Deploy, Version Control, and Manage ML Models Right From Your Jupyter Notebook with Modelbit
Gaussian Mixture Models (GMMs): The Flexible Twin of KMeans.
To receive all full articles and support the Daily Dose of Data Science, consider subscribing:
👉 Tell the world what makes this newsletter special for you by leaving a review here :)
👉 If you love reading this newsletter, feel free to share it with friends!


The importance function is a rescaled logit function, so maybe there is some theoretical foundation behind it.
For a misclassification the new weight should be more than the previous. I think you made a sign error in the reweight calculation formula.