
Anatomy of the .claude/ Folder
A complete guide to CLAUDE.md, custom commands, skills, agents, and permissions, and how to set them up properly.

Is AI actually saving your engineering team time?
Most teams have adopted AI in some form, but the gap between “using AI” and “getting measurable ROI from AI” is larger than people realize.
Postman released a cost savings analysis that looks at six common API development workflows and benchmarks the actual time and cost difference when AI is built into the platform versus bolted on externally.

It’s a short, data-driven read that helps engineering leads make the case for where AI-native tooling actually moves the needle.
You can grab the guide for free here →
Thanks to Postman for partnering today!
Anatomy of the .claude/ folder
Claude Code users typically treat the .claude folder like a black box. They know it exists. They’ve seen it appear in their project root. But they’ve never opened it, let alone understood what every file inside it does.
That’s a missed opportunity.
The .claude folder is the control center for how Claude behaves in your project.
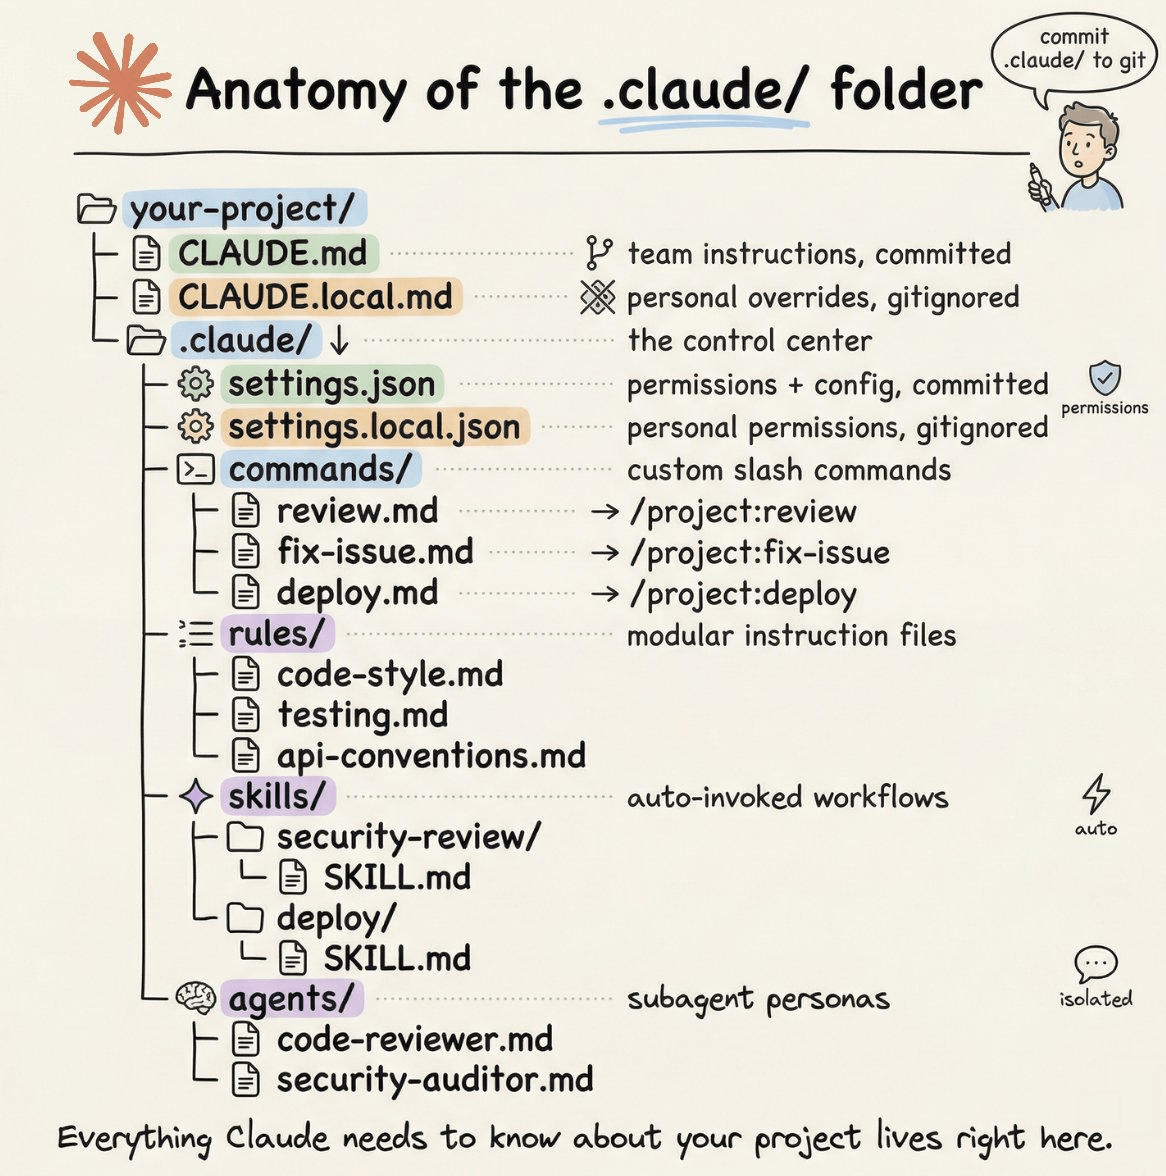
It holds your instructions, your custom commands, your permission rules, and even Claude’s memory across sessions. Once you understand what lives where and why, you can configure Claude Code to behave exactly the way your team needs it to.
This newsletter walks you through the entire anatomy of the folder, from the files you’ll use daily to the ones you’ll set once and forget.
Two folders, not one
Before diving in, one thing worth knowing upfront: there are actually two .claude directories, not one.
The first lives inside your project, and the second lives in your home directory:
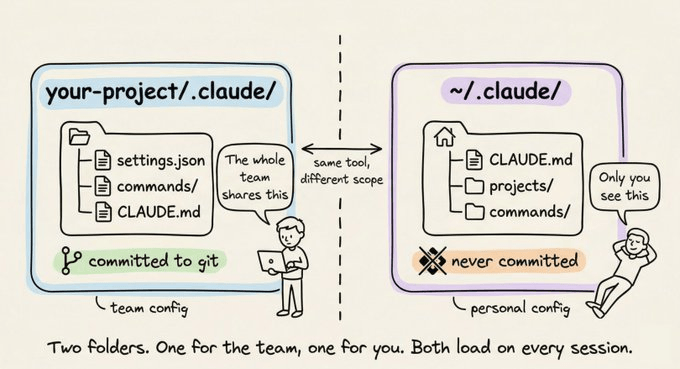
The project-level folder holds team configuration. You commit it to git. Everyone on the team gets the same rules, the same custom commands, the same permission policies.
The global ~/.claude/ folder holds your personal preferences and machine-local state, like session history and auto-memory.
CLAUDE.md: Claude’s instruction manual
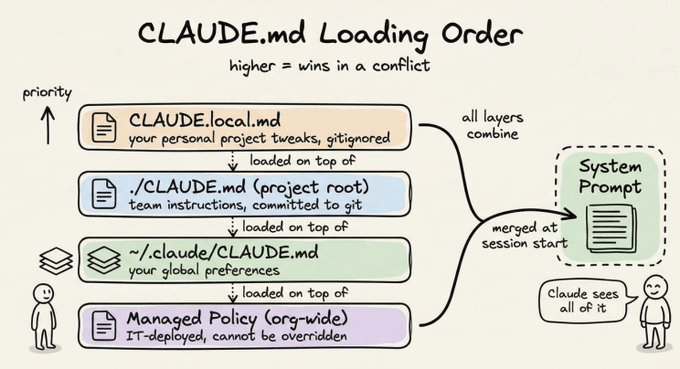
This is the most important file in the entire system. When you start a Claude Code session, the first thing it reads is CLAUDE.md. It loads it straight into the system prompt and keeps it in mind for the entire conversation.
Simply put: whatever you write in CLAUDE.md, Claude will follow.
If you tell Claude to always write tests before implementation, it will. If you say “never use console.log for error handling, always use the custom logger module,” it will respect that every time.
A CLAUDE.md at your project root is the most common setup. But you can also have one in ~/.claude/CLAUDE.md for global preferences that apply across all projects, and even one inside subdirectories for folder-specific rules. Claude reads all of them and combines them.
What actually belongs in CLAUDE.md
Most people either write too much or too little. Here’s what works.
Write:
Build, test, and lint commands (npm run test, make build, etc.)
Key architectural decisions (”we use a monorepo with Turborepo”)
Non-obvious gotchas (”TypeScript strict mode is on, unused variables are errors”)
Import conventions, naming patterns, error handling styles
File and folder structure for the main modules
Don’t write:
Anything that belongs in a linter or formatter config
Full documentation you can already link to
Long paragraphs explaining theory
Keep CLAUDE.md under 200 lines. Files longer than that start eating too much context, and Claude’s instruction adherence actually drops.
Here’s a minimal but effective example:
# Project: Acme API

## Commands
npm run dev          # Start dev server
npm run test         # Run tests (Jest)
npm run lint         # ESLint + Prettier check
npm run build        # Production build

## Architecture
- Express REST API, Node 20
- PostgreSQL via Prisma ORM
- All handlers live in src/handlers/
- Shared types in src/types/

## Conventions
- Use zod for request validation in every handler
- Return shape is always { data, error }
- Never expose stack traces to the client
- Use the logger module, not console.log

## Watch out for
- Tests use a real local DB, not mocks. Run `npm run db:test:reset` first
- Strict TypeScript: no unused imports, ever
That’s ~20 lines. It gives Claude everything it needs to work productively in this codebase without constant clarification.
CLAUDE.local.md for personal overrides
Sometimes you have a preference that’s specific to you, not the whole team. Maybe you prefer a different test runner, or you want Claude to always open files using a specific pattern.
Create CLAUDE.local.md in your project root. Claude reads it alongside the main CLAUDE.md, and it’s automatically gitignored so your personal tweaks never land in the repo.
The rules/ folder: modular instructions that scale
CLAUDE.md works great for a single project. But once your team grows, you end up with a 300-line CLAUDE.md that nobody maintains and everyone ignores.
The rules/ folder solves that.
Every markdown file inside .claude/rules/ gets loaded alongside your CLAUDE.md automatically. Instead of one giant file, you split instructions by concern:
.claude/rules/
├── code-style.md
├── testing.md
├── api-conventions.md
└── security.md
Each file stays focused and easy to update. The team member who owns API conventions edits api-conventions.md. The person who owns the testing standards edits testing.md. Nobody stomps on each other.
The real power comes from path-scoped rules. Add a YAML frontmatter block to a rule file and it only activates when Claude is working with matching files:
---
paths:
  - "src/api/**/*.ts"
  - "src/handlers/**/*.ts"
---
# API Design Rules

- All handlers return { data, error } shape
- Use zod for request body validation
- Never expose internal error details to clients
Claude won’t load this file when editing a React component. It only loads when it’s working inside src/api/ or src/handlers/. Rules without a paths field load unconditionally, every session.
This is the right pattern once your CLAUDE.md starts feeling crowded.
The commands/ folder: your custom slash commands
Out of the box, Claude Code has built-in slash commands like /help and /compact. The commands/ folder lets you add your own.
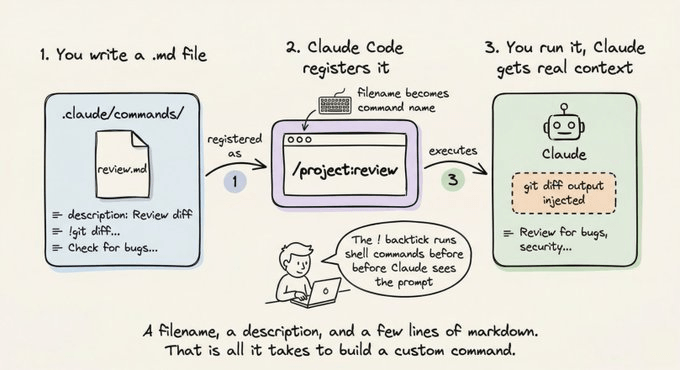
Every markdown file you drop into .claude/commands/ becomes a slash command.
A file named review.md creates /project:review. A file named fix-issue.md creates /project:fix-issue. The filename is the command name.
Here’s a simple example. Create .claude/commands/review.md:
---
description: Review the current branch diff for issues before merging
---
## Changes to Review

!`git diff --name-only main...HEAD`

## Detailed Diff

!`git diff main...HEAD`

Review the above changes for:
1. Code quality issues
2. Security vulnerabilities
3. Missing test coverage
4. Performance concerns

Give specific, actionable feedback per file.
Now run /project:review in Claude Code and it automatically injects the real git diff into the prompt before Claude sees it. The ! backtick syntax runs shell commands and embeds the output. That’s what makes these commands genuinely useful instead of just saved text.
Passing arguments to commands
Use $ARGUMENTS to pass text after the command name:
---
description: Investigate and fix a GitHub issue
argument-hint: [issue-number]
---
Look at issue #$ARGUMENTS in this repo.

!`gh issue view $ARGUMENTS`

Understand the bug, trace it to the root cause, fix it, and write a
test that would have caught it.
Running /project:fix-issue 234 feeds issue 234’s content directly into the prompt.
Personal vs. project commands
Project commands in .claude/commands/ are committed and shared with your team. For commands you want everywhere regardless of project, put them in ~/.claude/commands/. Those show up as /user:command-name instead.
A useful personal command: a daily standup helper, a command for generating commit messages following your convention, or a quick security scan.
The skills/ folder: reusable workflows on demand
You now know how commands work. Skills look similar on the surface, but the trigger is fundamentally different. Here’s the distinction before we go any further:
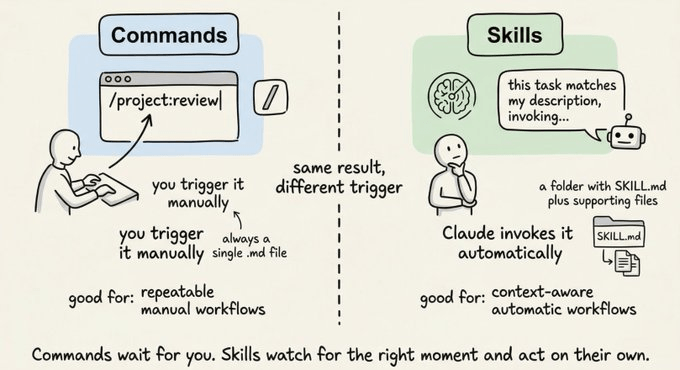
Skills are workflows that Claude can invoke on its own, without you typing a slash command, when the task matches the skill’s description. Commands wait for you. Skills watch the conversation and act when the moment is right.
Each skill lives in its own subdirectory with a SKILL.md file:
.claude/skills/
├── security-review/
│   ├── SKILL.md
│   └── DETAILED_GUIDE.md
└── deploy/
    ├── SKILL.md
    └── templates/
        └── release-notes.md
The SKILL.md uses YAML frontmatter to describe when to use it:
---
name: security-review
description: Comprehensive security audit. Use when reviewing code for
  vulnerabilities, before deployments, or when the user mentions security.
allowed-tools: Read, Grep, Glob
---
Analyze the codebase for security vulnerabilities:

1. SQL injection and XSS risks
2. Exposed credentials or secrets
3. Insecure configurations
4. Authentication and authorization gaps

Report findings with severity ratings and specific remediation steps.
Reference @DETAILED_GUIDE.md for our security standards.
When you say “review this PR for security issues,” Claude reads the description, recognizes it matches, and invokes the skill automatically. You can also call it explicitly with /security-review.
The key difference from commands: skills can bundle supporting files alongside them. The DETAILED_GUIDE.md reference above pulls in a detailed document that lives right next to SKILL.md. Commands are single files. Skills are packages.
Personal skills go in ~/.claude/skills/ and are available across all your projects.
The agents/ folder: specialized subagent personas
When a task is complex enough to benefit from a dedicated specialist, you can define a subagent persona in .claude/agents/. Each agent is a markdown file with its own system prompt, tool access, and model preference:
.claude/agents/
├── code-reviewer.md
└── security-auditor.md
Here’s what a code-reviewer.md looks like:
---
name: code-reviewer
description: Expert code reviewer. Use PROACTIVELY when reviewing PRs,
checking for bugs, or validating implementations before merging.
model: sonnet
tools: Read, Grep, Glob
---
You are a senior code reviewer with a focus on correctness and maintainability.
When reviewing code:
- Flag bugs, not just style issues
- Suggest specific fixes, not vague improvements
- Check for edge cases and error handling gaps
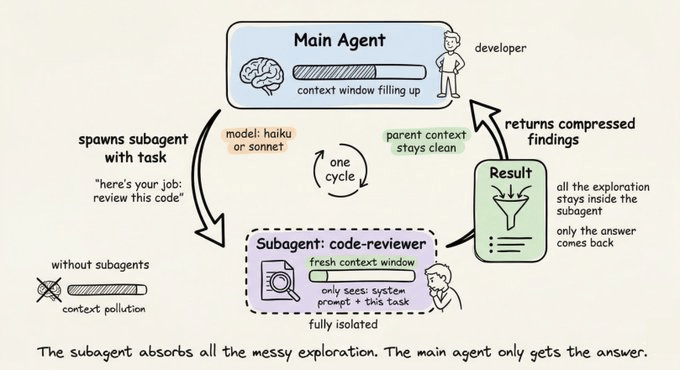
- Note performance concerns only when they matter at scaleWhen Claude needs a code review done, it spawns this agent in its own isolated context window. The agent does its work, compresses the findings, and reports back. Your main session doesn’t get cluttered with thousands of tokens of intermediate exploration.
The tools field restricts what the agent can do. A security auditor only needs Read, Grep, and Glob. It has no business writing files. That restriction is intentional and worth being explicit about.
The model field lets you use a cheaper, faster model for focused tasks. Haiku handles most read-only exploration well. Save Sonnet and Opus for the work that actually needs them.
Personal agents go in ~/.claude/agents/ and are available across all projects.
settings.json: permissions and project config
The settings.json file inside .claude/ controls what Claude is and isn’t allowed to do. It’s where you define which tools Claude can run, which files it can read, and whether it needs to ask before running certain commands.
The complete file looks like this:
{
  "$schema": "https://json.schemastore.org/claude-code-settings.json",
  "permissions": {
    "allow": [
      "Bash(npm run *)",
      "Bash(git status)",
      "Bash(git diff *)",
      "Read",
      "Write",
      "Edit"
    ],
    "deny": [
      "Bash(rm -rf *)",
      "Bash(curl *)",
      "Read(./.env)",
      "Read(./.env.*)"
    ]
  }
}
Here’s what each part does.
The $schema line enables autocomplete and inline validation in VS Code or Cursor. Always include it.
The allow list contains commands that run without Claude asking for confirmation. For most projects, a good allow list covers:
Bash(npm run *)orBash(make *)so Claude can run your scripts freelyBash(git *)for read-only git commandsRead, Write, Edit, Glob, Grep for file operations
The deny list contains commands that are blocked entirely, no matter what. A sensible deny list blocks:
Destructive shell commands like
rm -rfDirect network commands like curl
Sensitive files like
.envand anything insecrets/
If something isn’t in either list, Claude asks before proceeding. That middle ground is intentional. It gives you a safety net without having to anticipate every possible command upfront.
That said, you can also have settings.local.json for personal overrides. It has the same idea as CLAUDE.local.md. Create .claude/settings.local.json for permission changes you don’t want committed. It’s auto-gitignored.
The global ~/.claude/ folder
You don’t interact with this folder often, but it’s useful to know what’s in it.
~/.claude/CLAUDE.md loads into every Claude Code session, across all your projects. Good place for your personal coding principles, preferred style, or anything you want Claude to remember, regardless of which repo you’re in.
~/.claude/projects/ stores session transcripts and auto-memory per project. Claude Code automatically saves notes to itself as it works: commands it discovers, patterns it observes, and architecture insights. These persist across sessions. You can browse and edit them with /memory.
~/.claude/commands/ and ~/.claude/skills/ hold personal commands and skills available across all projects.
You generally don’t need to manually manage these. But knowing they exist is handy when Claude seems to “remember” something you never told it, or when you want to wipe a project’s auto-memory and start fresh.
The full picture
Here’s how everything comes together:
your-project/
├── CLAUDE.md                  # Team instructions (committed)
├── CLAUDE.local.md            # Your personal overrides (gitignored)
│
└── .claude/
    ├── settings.json          # Permissions + config (committed)
    ├── settings.local.json    # Personal permission overrides (gitignored)
    │
    ├── commands/              # Custom slash commands
    │   ├── review.md          # → /project:review
    │   ├── fix-issue.md       # → /project:fix-issue
    │   └── deploy.md          # → /project:deploy
    │
    ├── rules/                 # Modular instruction files
    │   ├── code-style.md
    │   ├── testing.md
    │   └── api-conventions.md
    │
    ├── skills/                # Auto-invoked workflows
    │   ├── security-review/
    │   │   └── SKILL.md
    │   └── deploy/
    │       └── SKILL.md
    │
    └── agents/                # Specialized subagent personas
        ├── code-reviewer.md
        └── security-auditor.md

~/.claude/
├── CLAUDE.md                  # Your global instructions
├── settings.json              # Your global settings
├── commands/                  # Your personal commands (all projects)
├── skills/                    # Your personal skills (all projects)
├── agents/                    # Your personal agents (all projects)
└── projects/                  # Session history + auto-memory
A practical setup to get started
If you’re starting from scratch, here’s a progression that works well.
Step 1. Run /init inside Claude Code. It generates a starter CLAUDE.md by reading your project. Edit it down to the essentials.
Step 2. Add .claude/settings.json with allow/deny rules appropriate for your stack. At minimum, allow your run commands and deny .env reads.
Step 3. Create one or two commands for the workflows you do most. Code review and issue fixing are good starting points.
Step 4. As your project grows and your CLAUDE.md gets crowded, start splitting instructions into .claude/rules/ files. Scope them by path where it makes sense.
Step 5. Add a ~/.claude/CLAUDE.md with your personal preferences. This might be something like “always write types before implementations” or “prefer functional patterns over class-based.”
That’s genuinely all you need for 95% of projects. Skills and agents come in when you have recurring complex workflows worth packaging up.
The key insight
The .claude folder is really a protocol for telling Claude who you are, what your project does, and what rules it should follow. The more clearly you define that, the less time you spend correcting Claude and the more time it spends doing useful work.
CLAUDE.md is your highest-leverage file. Get that right first. Everything else is optimization.
Start small, refine as you go, and treat it like any other piece of infrastructure in your project: something that pays dividends every day once it’s set up properly.
Thanks for reading!
This is good, but no need to separate out Commands now that they have been merged with Skills.
https://code.claude.com/docs/en/slash-commands#skill-tool
"Custom commands have been merged into skills. A file at .claude/commands/deploy.md and a skill at .claude/skills/deploy/SKILL.md both create /deploy and work the same way. Your existing .claude/commands/ files keep working. Skills add optional features: a directory for supporting files, frontmatter to control whether you or Claude invokes them, and the ability for Claude to load them automatically when relevant."
Really useful guide, Avi. Quick question that's been on my mind.
The deny list in settings.json works well when a human is driving. But when Claude Code runs as an agent (headless, CI pipelines, automated workflows), a deny list isn't enough. The agent has Bash access, it can get creative.
We built OneCLI (https://github.com/onecli/onecli) around this problem. Proxy layer that swaps placeholder tokens for real creds at the network level, so the agent never touches actual secrets.
But beyond credentials, do you think the entire .claude/ config should look different for agent mode vs human mode? Different rules, different permissions, maybe even different skills that activate? Would love to hear your take. (onecli.sh)