

Muse Glimmer is a 30B vision model, distilled from Meta’s frontier model Muse Spark and then trained further on agent-heavy data.
A dense 30B model fits on a single GPU, so you can run it on your own server or an air-gapped box, and your data never leaves that machine.
It’s also a break from Meta’s recent open releases:
It’s the first open model from Meta Superintelligence Labs and Meta’s first open release since Llama 4.
It ships under Apache 2.0 instead of the Llama license, so you can fine-tune, rename, or ship it commercially with no user caps, usage policy, or branding.
Out of the box, a general model won’t handle your specific task well. In this article, we’ll fine-tune Muse Glimmer to convert images of equations into LaTeX.
What makes Muse Glimmer different?
Muse Glimmer pairs a ~29.6B-parameter decoder with a 1.8B-parameter ViT-G/14 vision encoder. It takes text and images as input and outputs text.
At that size, the weights aren't the only memory problem. As the model reads a long input, it stores keys and values for every past token in every layer. This store is the KV cache, and at long contexts it can grow larger than the weights.
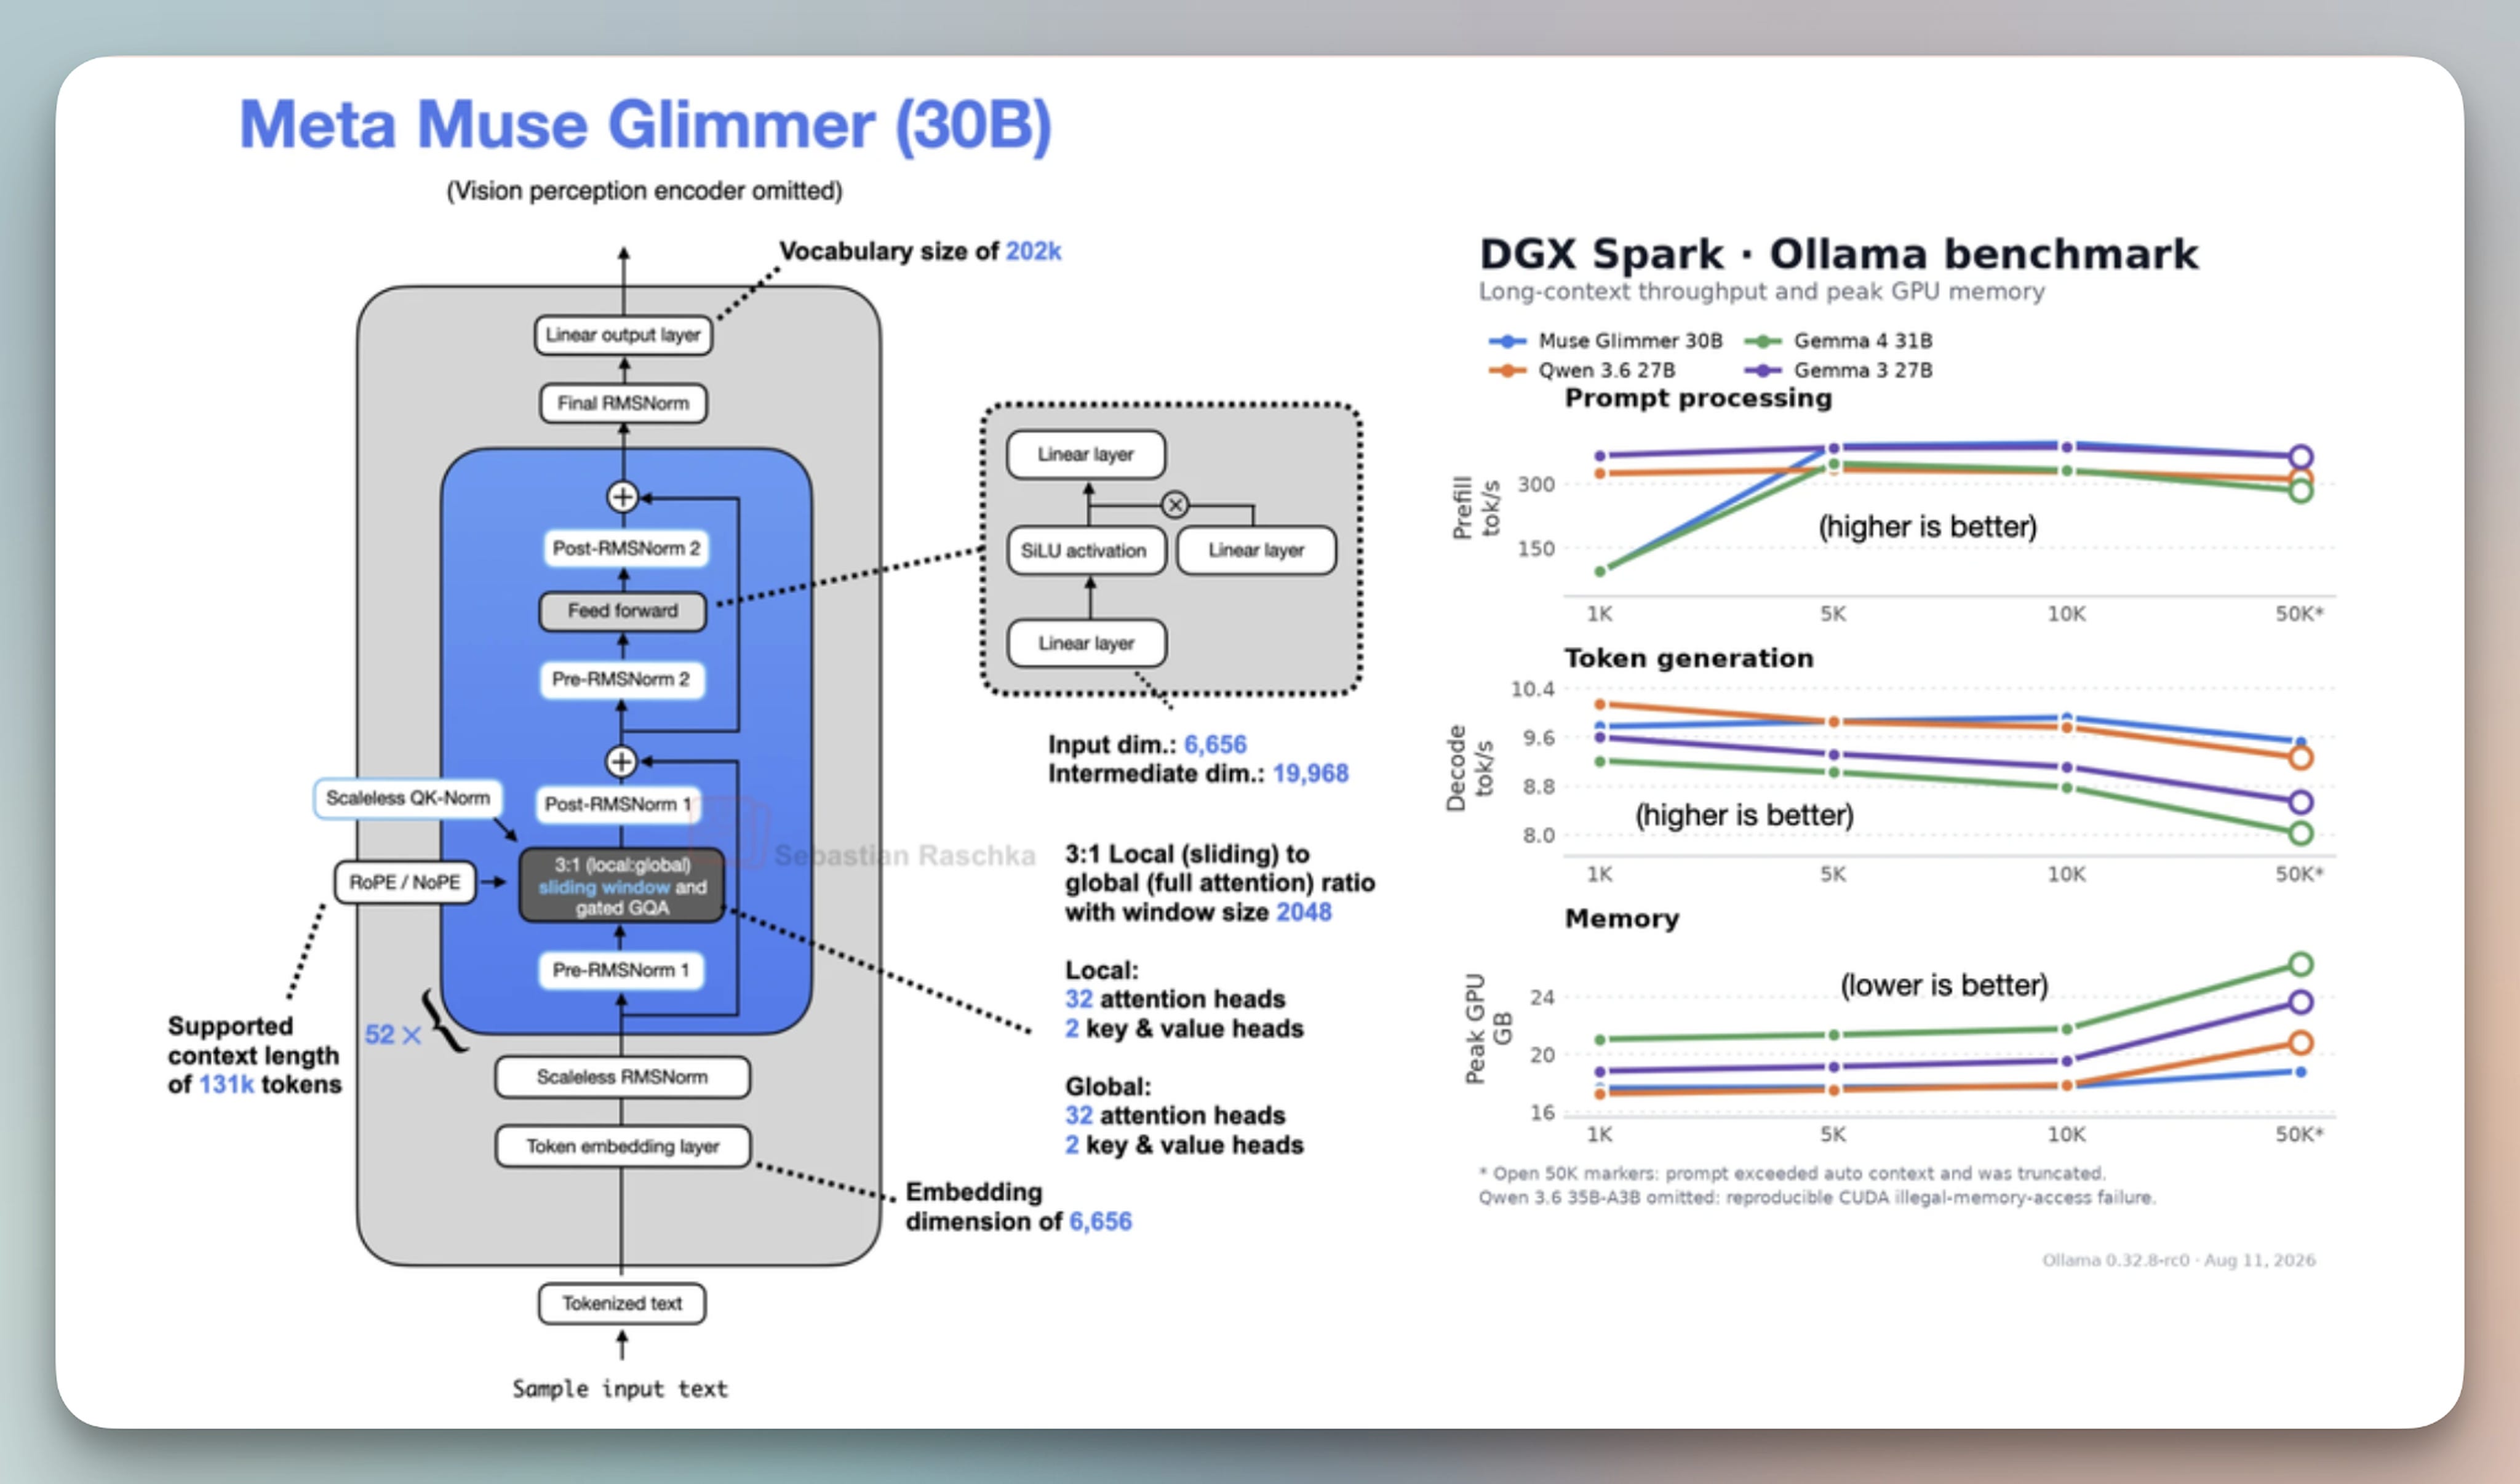
Glimmer makes two choices to keep it small:
Most layers only look back 2,048 tokens. The layers repeat a pattern of three sliding-window layers and one global layer. At a 131K context, 39 layers cache at most 2,048 tokens each, so the cache is about a quarter of full attention.
32 query heads share just 2 KV heads. That cuts the cache by another 16x.
Together, that's roughly 60x less KV memory than a naive design. That’s why a 131K token default context (extendable to 262K) is usable on hardware you own.
Muse Glimmer also uses its own chat format, ATEM. Every turn looks like this:
<|start|>{role}<|message|>...<|eot|>
Before answering, the assistant can send a message addressed to itself. That’s a private reasoning channel. Only then does it answer on the user channel.
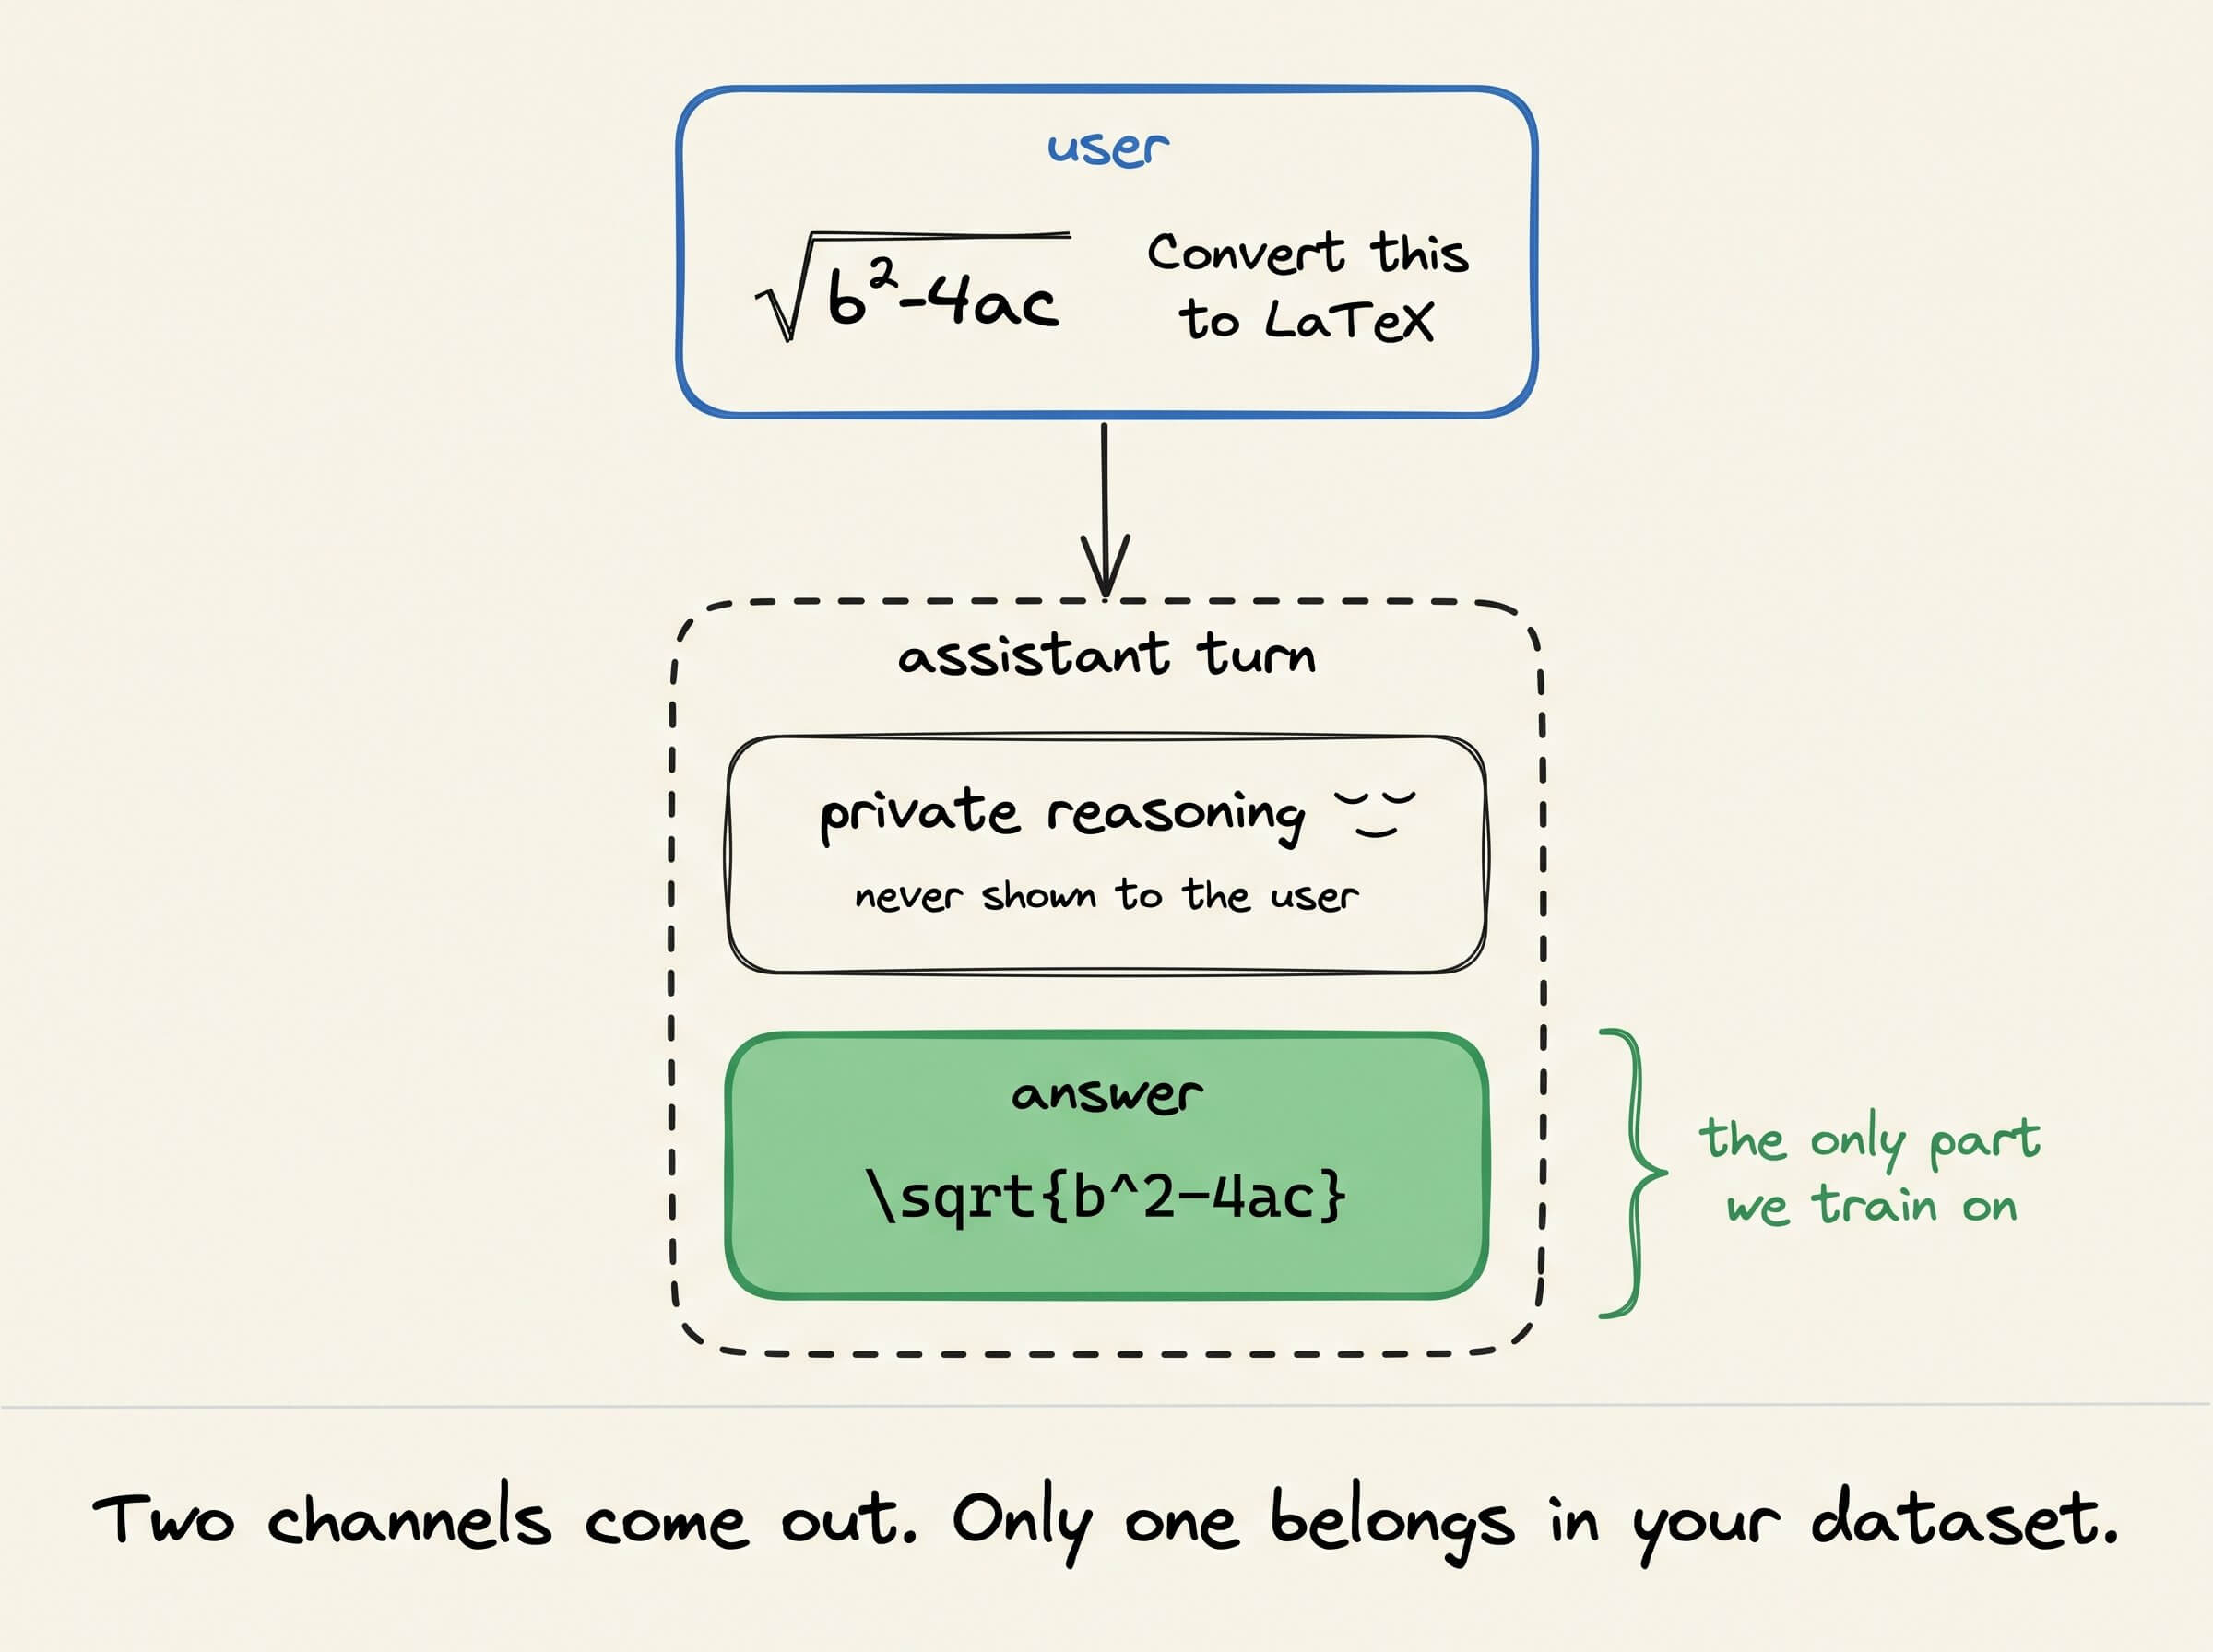
How much it reasons is a dial called reasoning strength. For ‘high’ mode, unless you change it, you pay for an expensive setting on every prompt.
This matters for fine-tuning, as:
Your dataset must follow ATEM exactly. A mismatched template degrades training.
You decide whether to train on reasoning. For converting an equation image to LaTeX, long reasoning mostly adds latency, so [your choice and why].
Where it’s strong, and where it isn’t
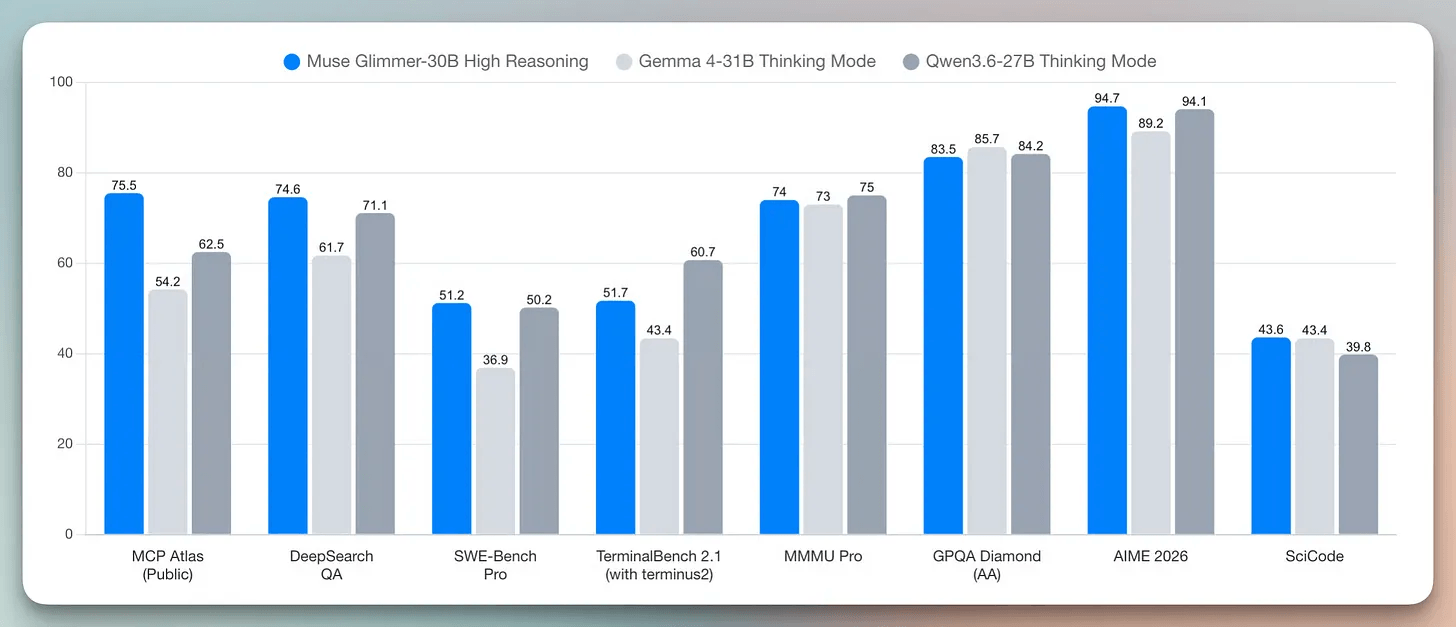
Glimmer leads on agentic tool use, most clearly on MCP Atlas, where it beats the next-best model, Qwen3.6-27B, by 13 points.
On vision and document benchmarks, it lands within two points of Qwen3.6-27B, ahead on one and behind on three.
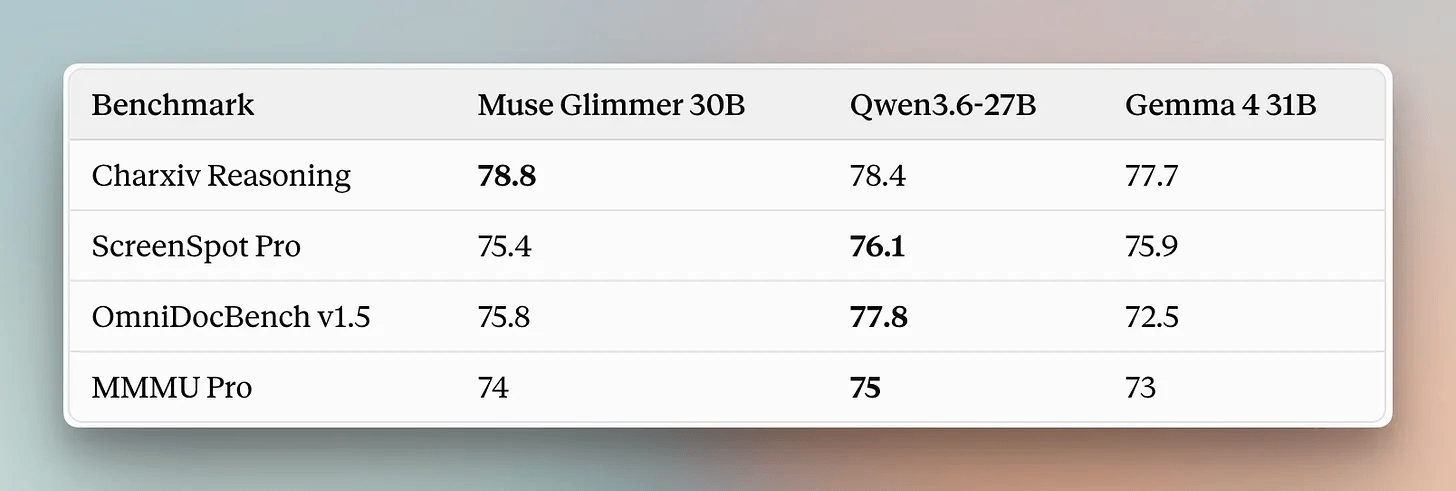
That’s why fine-tuning helps here because general benchmarks don’t measure your task.
A model that reads images well still won’t output the exact LaTeX your system expects, and a training run closes that gap.
Why fine-tune at all?
Our task is math OCR. The model takes an image of a typeset formula and returns its LaTeX source.
Here’s the base model on one sample from the dataset, before any training:

And here’s the ground truth:

The model gets the layout right: the integral, the braces, and the fraction. The rest goes wrong in two ways.
It breaks the output contract:
It wraps the answer in display math
It answers twice and adds commentary
It writes compact LaTeX where the dataset expects space-separated tokens
It misreads the math:
ζ becomes χ
The first derivative term loses its ^\dagger
For a pipeline that expects one line of LaTeX in a fixed style, this output is unusable. Even the formatting alone fails an exact-match check, which scores compact LaTeX as wrong even when it renders identically.
Most real vision tasks have the same gap, whether it's invoice fields, chart values, lab forms, or UI screenshots. The base model can read. Fine-tuning teaches the model your output structure and your domain use.
What we’ll build
We'll fine-tune Muse Glimmer on unsloth/LaTeX_OCR dataset, measure the exact match on formulas before & after training, and save the result for local use.
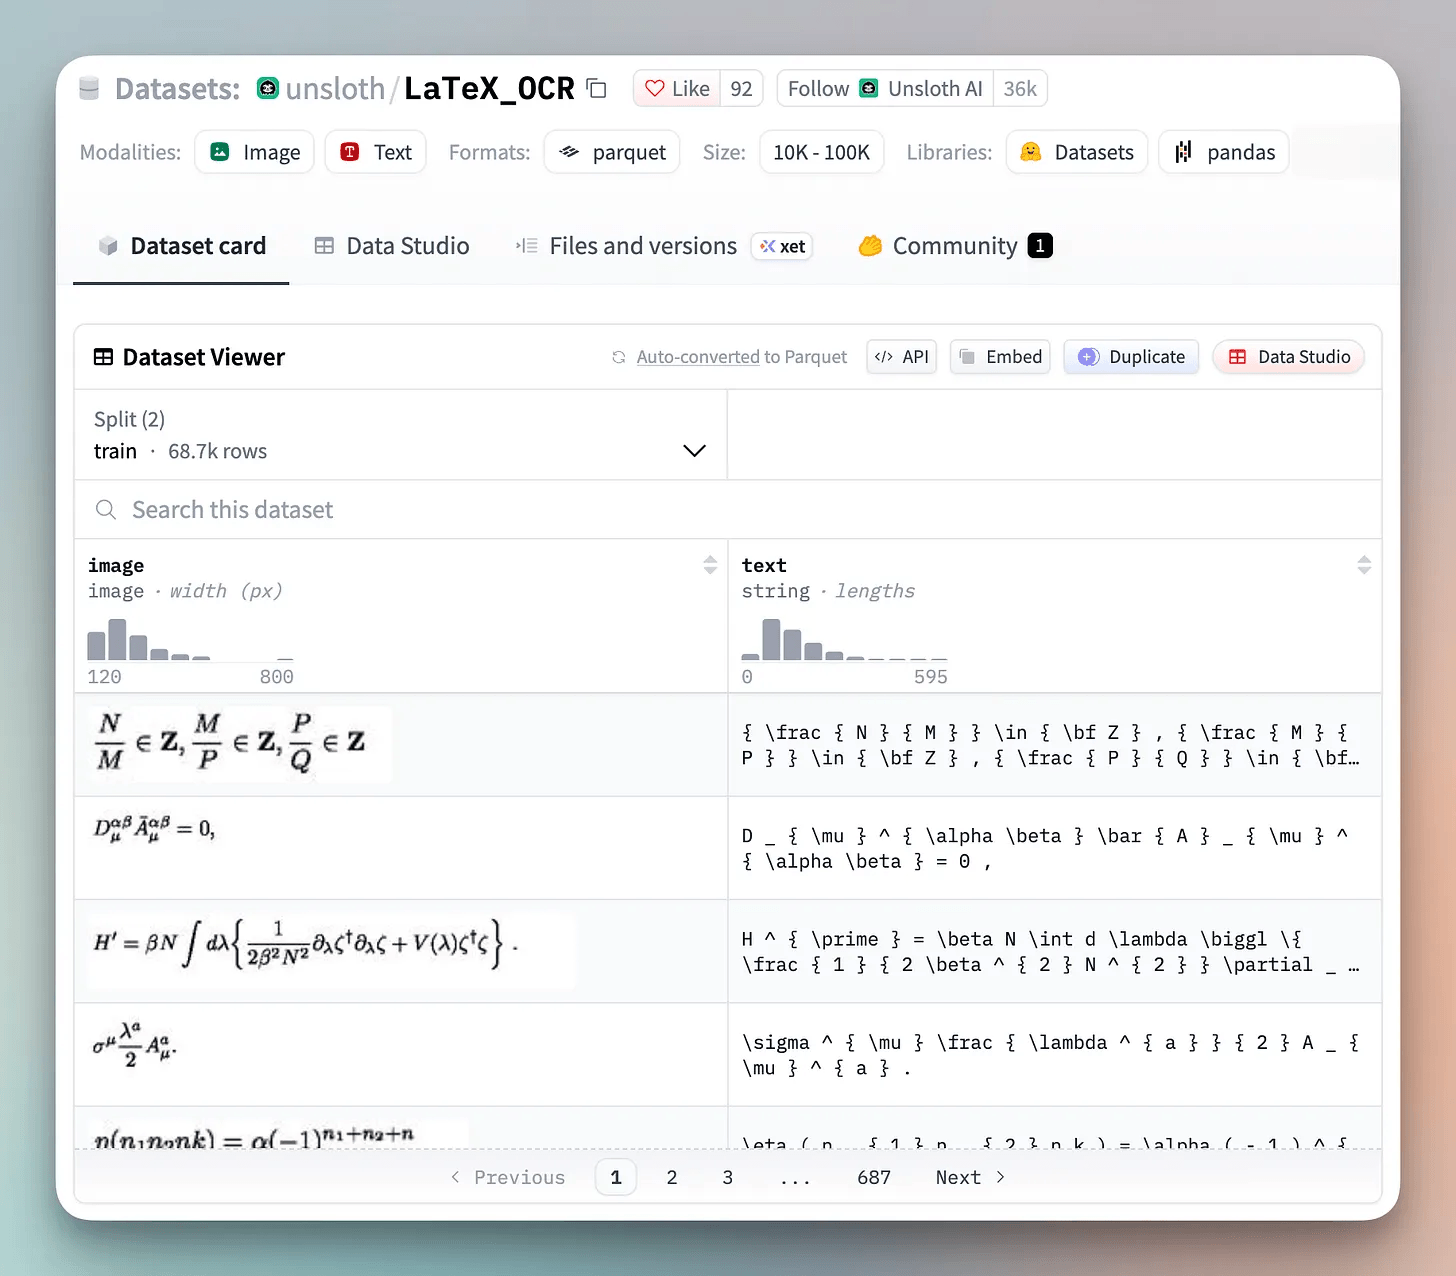
Here’s the stack we will be using:
Unsloth for 4-bit loading, LoRA adapters, and training
Hugging Face Datasets for the LaTeX OCR data
And here’s the game plan:
Load the model
Add LoRA adapters
Prepare the dataset
Read the chat template
Run baseline inference
Train the model
Inference with the fine-tuned model
Save and export
Streamlit UI
Load the model
The full BF16 weights take about 56 GB. Unsloth's Dynamic 4-bit build cuts that, as it quantizes most layers to 4-bit and keeps the layers that lose the most accuracy under quantization in 16-bit.
from unsloth import FastModel

model, processor = FastModel.from_pretrained(
    model_name     = "unsloth/Muse-Glimmer-30B-unsloth-bnb-4bit",
    max_seq_length = 1024,
)
Fitting this 30B model on consumer GPUs comes down to where the memory goes:
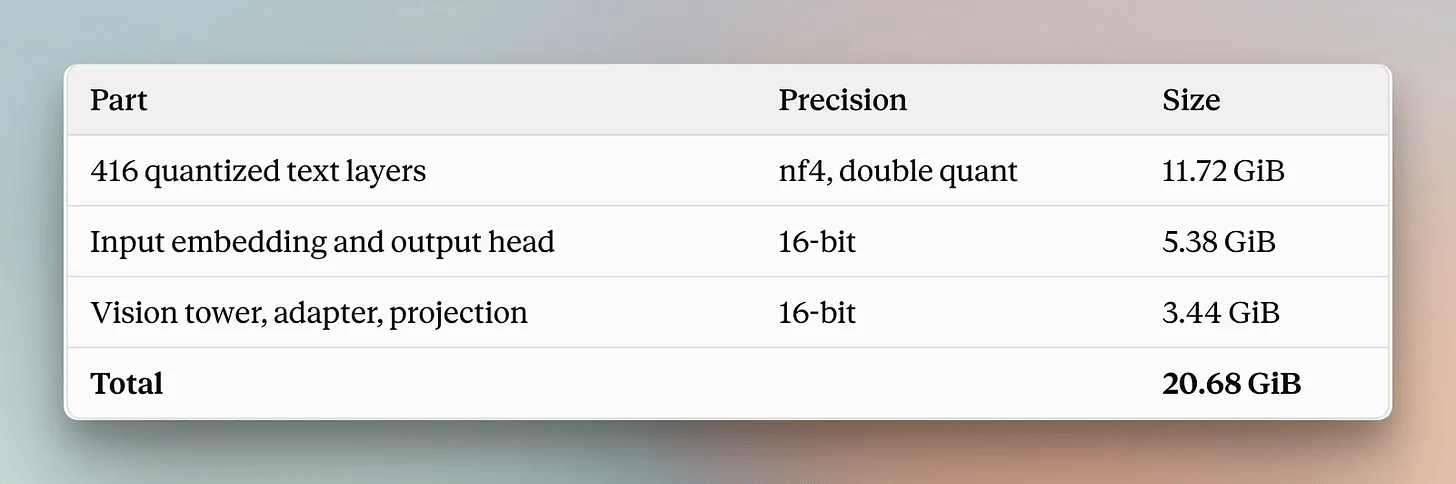
The input embedding and the output head, each a large matrix, take roughly 26% of it. They have the same shape, but the model uses them differently:
The input embedding is a lookup. Each token needs only its own row, and the table stays frozen during LoRA training.
So we offload it to CPU RAM and copy only the rows a batch needs onto the GPU.
The model output head (
lm_head) is a matrix multiply. Every token's logits need every row, so the head stays on the GPU.
Tips: QLoRA fits in 24 GB, while 16-bit LoRA needs more than 40 GB. Plan for a 24 GB card as the realistic minimum, and keep sequence lengths short at first.
With the model loaded, the next step is deciding which parts of it to train.
Add LoRA adapters
We won't update the model's 31B weights. LoRA freezes them and trains small low-rank matrices alongside selected layers. Only those matrices get gradients and optimizer states, and that's what keeps training inside the headroom we have.
model = FastModel.get_peft_model(
    model,
    finetune_vision_layers     = True,  # False if not finetuning vision layers
    finetune_language_layers   = True,  # False if not finetuning language layers
    finetune_attention_modules = True,  # False if not finetuning attention layers
    finetune_mlp_modules       = True,  # False if not finetuning MLP layers

    r = 16,            # The larger, the higher the accuracy, but might overfit
    lora_alpha = 16,   # Recommended alpha == r at least
    lora_dropout = 0,
)
model.print_trainable_parameters()
The flags choose where the adapters go. You can target the vision tower, the language model, or both, and within each, the attention layers, the MLP layers, or both. With every flag on, we train 131M parameters, about 0.44% of the model.
Rank (r) = 16 is the recommended starting point, with Rank (r) = 32 is suggested for harder agentic tasks.
Why do we train the vision layers too?
For vision tasks, it is recommended to freeze the vision encoder first, train the language layers, and open up the vision side only if your data needs it.
We train both for two reasons:
The base model read ζ as χ. It could be a vision encoder error or the language model’s. We can’t tell what the mistake is. Training both covers either case.
Our inputs are unusual. Typeset math looks very different from the natural images most vision encoders see in pretraining.
If you want a smaller adapter and a cheaper run, try language-only training first. If it matches accuracy on your data, keep it.
Now the adapters need data in a shape the model understands.
Prepare the dataset
The LaTeX OCR dataset has 68,686 image-and-LaTeX pairs, like the formula we saw earlier.
from datasets import load_dataset

dataset = load_dataset("unsloth/LaTeX_OCR", split = "train")
dataset
# Dataset({
#     features: ['image', 'text'],
#     num_rows: 68686
# })
The vision trainer expects all fine-tuning data to be a list of messages, where image parts sit next to text parts inside content.
In each user turn, both the image and the instruction should be included, while the LaTeX content should be provided in the assistant's turn.
instruction = "Write the LaTeX representation for this image."

def convert_to_conversation(sample):
    return {"messages": [
        {"role": "user", "content": [
            {"type": "image", "image": sample["image"]},
            {"type": "text",  "text": instruction},
        ]},
        {"role": "assistant", "content": [
            {"type": "text", "text": sample["text"]},
        ]},
    ]}

converted_dataset = [convert_to_conversation(sample) for sample in dataset]
Here’s what one converted sample looks like:
{
    “messages”: [
        {
            “role”: “user”,
            “content”: [
                {”type”: “image”, “image”: <PIL.PngImageFile image mode=RGB size=...>},
                {”type”: “text”,  “text”: “Write the LaTeX representation for this image.”},
            ],
        },
        {
            “role”: “assistant”,
            “content”: [
                {”type”: “text”, “text”: r”{ \frac { N } { M } } \in { \bf Z } , { \frac { M } { P } } \in { \bf Z } , { \frac { P } { Q } } \in { \bf Z }”},
            ],
        },
    ]
}
What happens to these messages next is specific to the model's chat template, which turns them into the exact tokens the model sees.
Read the chat template
Muse Glimmer doesn't use ChatML or the Llama format. If you use handwritten formatting code from another model, it will produce the wrong tokens.
Let’s render one training sample and look at the actual string:
example_text = processor.apply_chat_template(
    converted_dataset[0]["messages"], tokenize = False,
))
print(example_text)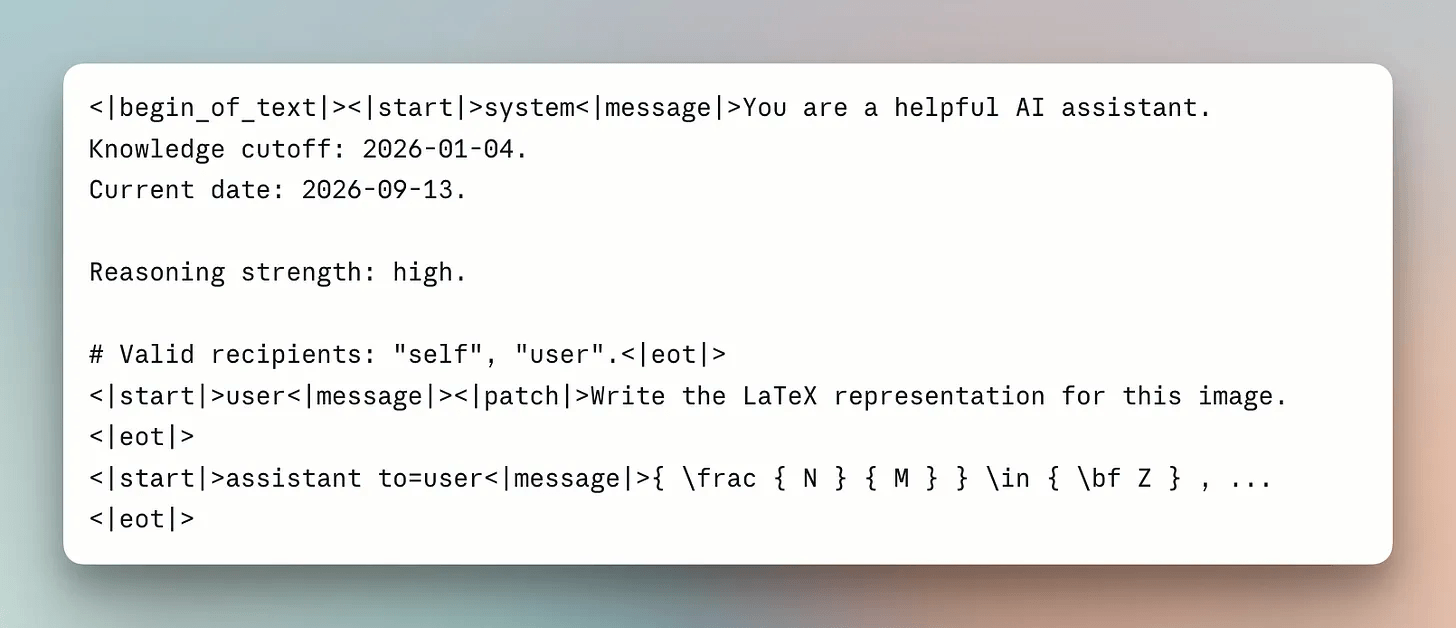
Four things in this output matter for training:
The image is a single
<|patch|>placeholder. Once the processor sees the real image, it expands the placeholder. A 448×448 image becomes 256 tokens, and those count against the model's maximum sequence length.The system block allows two recipients,
selfanduser. Theuserchannel carries the answer, the one the reader sees.The model reasons before it answers. Glimmer writes a private chain of thought to itself on the
selfchannel, then gives the real answer.How much it thinks is set by reasoning strength in the system block.
highby default.
Set the reasoning dial
reasoning_strength is a chat template argument, and it writes the strength line into the system block for you:
text = processor.apply_chat_template(
    messages, add_generation_prompt = True, tokenize = False,
    reasoning_strength = "low",   # low, medium, high, xhigh
)
Here’s what each setting costs on one held-out formula, with greedy decoding:
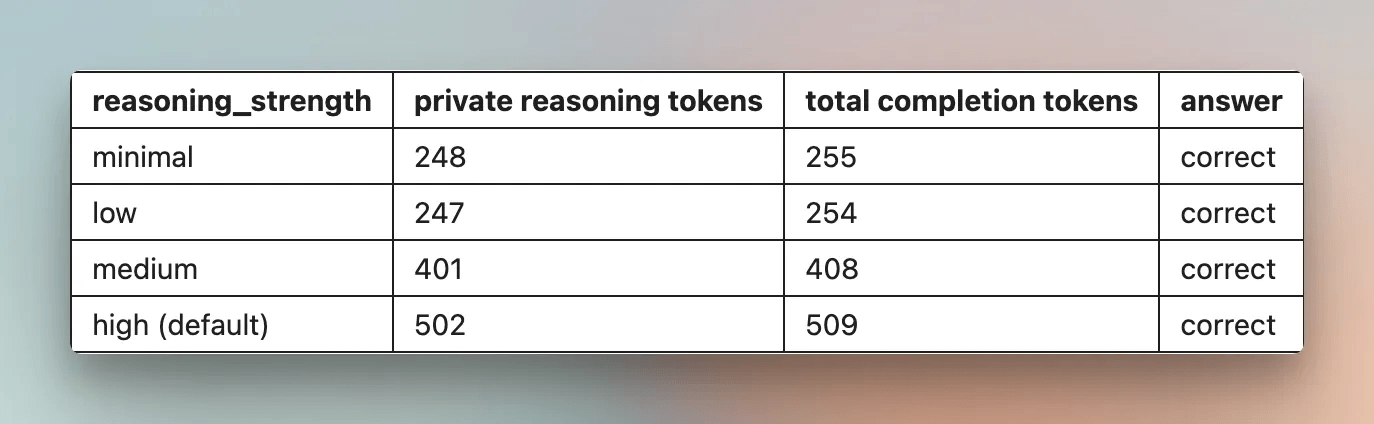
It is recommended to use high reasoning mode for coding and agent workflows, medium for simple assistants, and low when speed matters most.
Reasoning tokens count against max_new_tokens. If a run hits the limit mid-thought, it returns an empty answer. So raise it before you raise the reasoning.
Now that we understand the template, we can measure the baseline properly.
Run baseline inference
For our OCR use baseline eval, we want the model transcribing, not thinking.
Because transcription is a reading task, the answer comes from what’s in the image. Our training data also reflects that, since every example is an image and its LaTeX with no reasoning trace.
But by default, it won’t stop thinking. The rendered prompt stops at <|start|>assistant with the recipient unset, which is why the model writes to itself first and answers only after that.
Setting the recipient ourselves solves it. We append to=user<|message|> to the prompt, so the prompt skips the reasoning channel and generation starts on the answer channel:
def muse_glimmer_prompt(messages, answer_directly = True):
    """Build a Muse Glimmer generation prompt from chat messages."""
    text = processor.apply_chat_template(
        messages, add_generation_prompt = True, tokenize = False,
    )
    return text + " to=user<|message|>" if answer_directly else text
Run it on the same formula from earlier:
sample = dataset[2]
messages = [
    {"role": "user", "content": [
        {"type": "image"},
        {"type": "text", "text": instruction},
    ]},
]
inputs = processor(
    text = [muse_glimmer_prompt(messages)],
    images = [[sample["image"].convert("RGB")]],
    add_special_tokens = False,
    return_tensors = "pt",
).to("cuda")

# Stream only the generated answer, not the prompt
text_streamer = TextStreamer(processor.tokenizer, skip_prompt = True)
_ = model.generate(**inputs, streamer = text_streamer, max_new_tokens = 256,
                   use_cache = True, do_sample = False)
Meta recommends temperature = 1.0, top_p = 0.95, and top_k = 64 for open-ended and agentic use. Transcription needs the same answer every time, so we decode greedily.
\[
H' = \beta N \int d\lambda \left\{ \frac{1}{2\beta^2 N^2}\,\partial_\lambda \chi\,\partial_\lambda \chi + V(\lambda)\,\chi^\dagger \chi \right\}.
\]

The expression shown in the image is

\[
H' = \beta N \int d\lambda \left\{ \frac{1}{2\beta^2 N^2}\partial_\lambda \chi^\dagger \partial_\lambda \chi + V(\lambda)\chi^\dagger \chi \right\},
\]

with the conventional ordering $\partial_\lambda\chi^\dagger\partial_\lambda\chi$.<|eot|>
The base model produces a verbose, restyled output. The shape is unusable, and the symbols are not exact either. That's our baseline.
Fine-tuning has to close both gaps: one line of LaTeX in the dataset's style, matching the image character by character.
Now we train.
Train the model
The data collator builds each batch, expands the image tokens, and masks everything except the assistant's answer. Without the mask, every update will go to predicting the system and the instruction, which are identical in every sample.
The mask uses the earlier shown ATEM markers from the template section:
from unsloth.trainer import UnslothVisionDataCollator
from trl import SFTTrainer, SFTConfig

collator = UnslothVisionDataCollator(
    model, processor,
    max_seq_length = MAX_LEN,
    train_on_responses_only = True,
    # ATEM markers, straight out of the chat template
    instruction_part = "<|start|>user<|message|>",
    response_part    = "<|start|>assistant to=user<|message|>",
)

trainer = SFTTrainer(
    model = model,
    train_dataset = converted_dataset,
    processing_class = processor.tokenizer,
    data_collator = collator,
    args = SFTConfig(
        per_device_train_batch_size = 1,
        gradient_accumulation_steps = 4,   # effective batch of 4
        max_steps = 30,                    # have num_train_epochs for a full run
        warmup_steps = 5,                  # ramp up before the full learning rate
        learning_rate = 2e-4,              # standard for LoRA
        lr_scheduler_type = "linear",
        weight_decay = 0.001,
        optim = "adamw_8bit",              # ~4x less optimizer memory than 32-bit AdamW
        seed = 3407,
        max_length = 1024,
        report_to = "none",
        # the collator handles images & tokenization, so leave the raw data
        remove_unused_columns = False,
        dataset_text_field = "",
        dataset_kwargs = {"skip_prepare_dataset": True},
    ),
)
Before spending GPU time, let’s check that we are training the model only on the assistant answers:
batch = collator([converted_dataset[0], converted_dataset[1]])
labels = batch["labels"][0]
print("trained tokens:", int((labels != -100).sum()), "of", labels.numel())
print(processor.tokenizer.decode([t for t in labels.tolist() if t != -100]))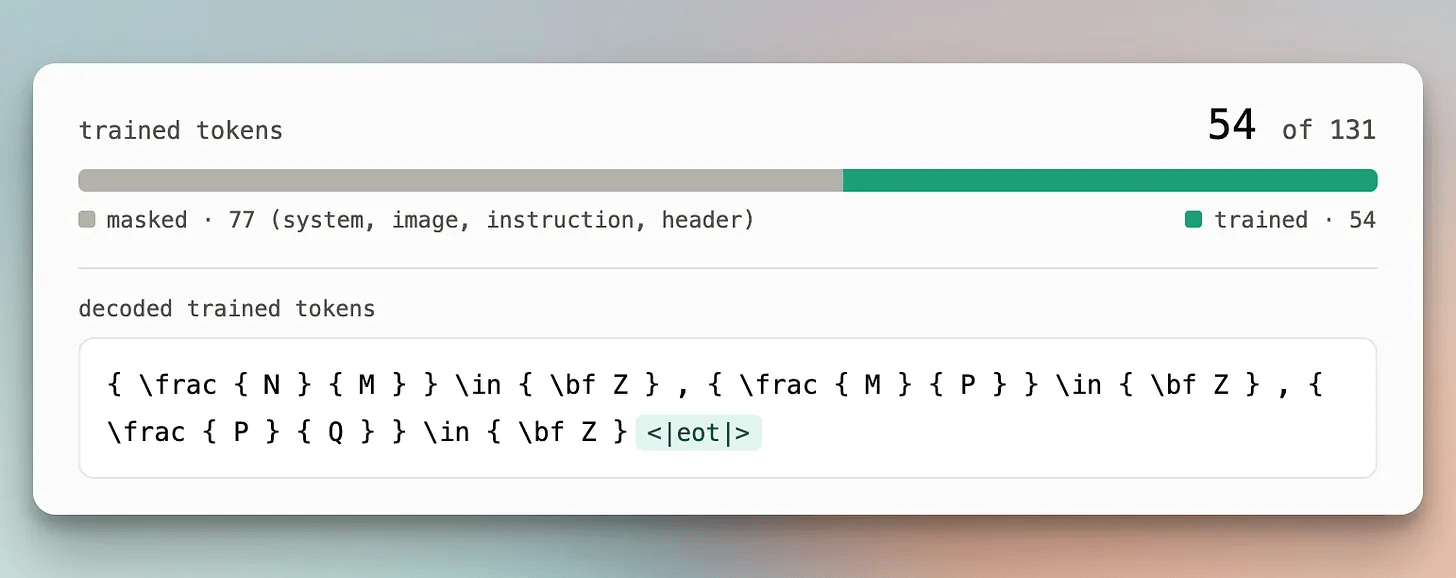
It confirms that the prompt, system block, and image tokens are all excluded. Ten seconds of checking here can save you from a run that learns the wrong thing.
One trade-off here is that we train only short, direct answers, and this can weaken multi-step reasoning. For an OCR model, that's acceptable. If the model also has to plan and call tools, mix reasoning-style examples into the dataset.
Let’s train:
trainer_stats = trainer.train()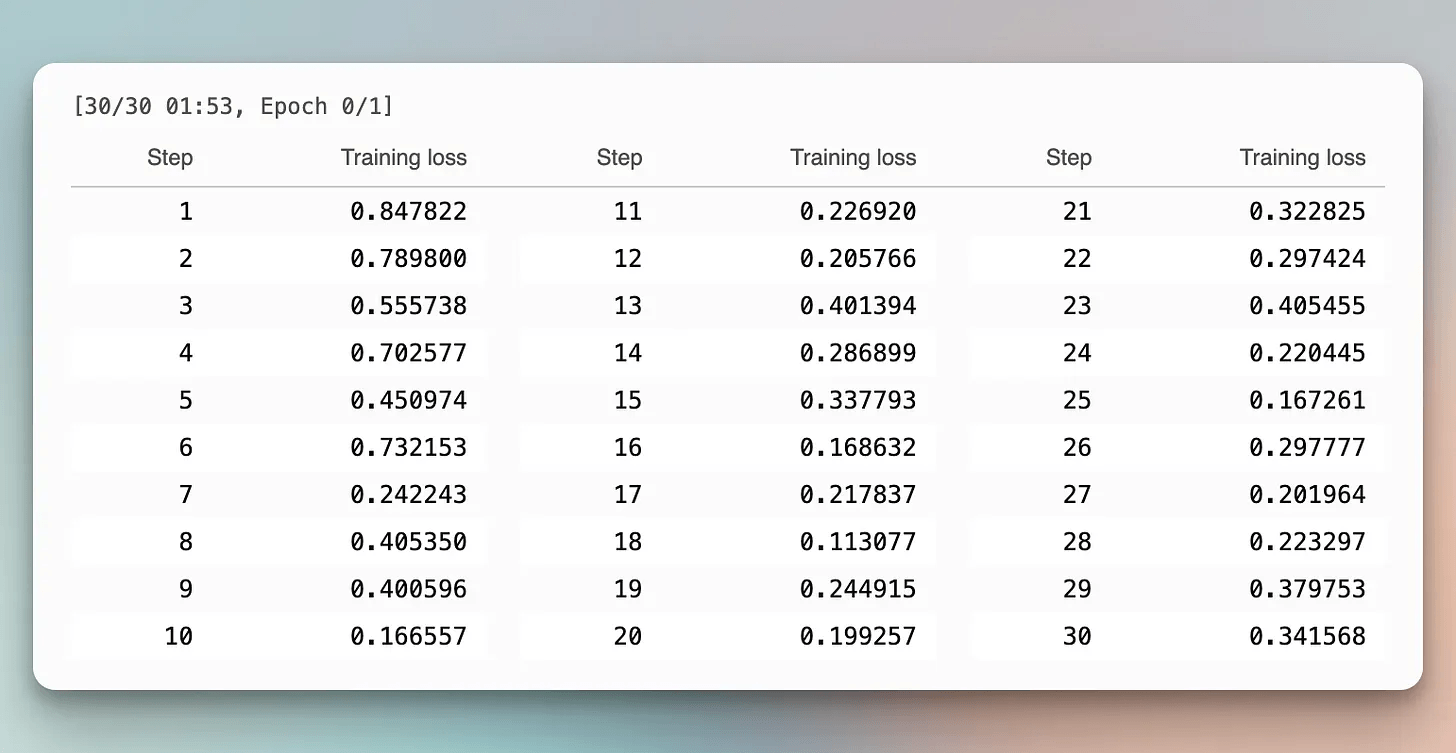
So what did the training steps actually change?
Inference with the fine-tuned model
Same helper, same prompt, on an image the model never trained on:
from unsloth import FastModel
from PIL import Image

model, processor = FastModel.from_pretrained(
    model_name     = "muse_glimmer_lora",
    max_seq_length = 1024,
)

image = Image.open("formula.png").convert("RGB")
messages = [
    {"role": "user", "content": [
        {"type": "image"},
        {"type": "text", "text": instruction},
    ]},
]

inputs = processor(
    text   = [muse_glimmer_prompt(messages)],   # still pinned to to=user
    images = [[image]],
    add_special_tokens = False,
    return_tensors     = "pt",
).to("cuda")

# generate() returns prompt + completion, so slice off the prompt
output_ids = model.generate(**inputs, max_new_tokens = 256, do_sample = False)
generated_ids = output_ids[:, inputs["input_ids"].shape[1]:]
print(processor.tokenizer.decode(generated_ids[0], skip_special_tokens = True))
The input image:

The LaTeX ground truth:
[ [ B _ { n } ^ { + } , b _ { 2 } ^ { - } ] , b _ { 2 } ^ { + } ] = n B _ { n } ^ { + } , \quad [ [ B _ { n } ^ { - } , b _ { 2 } ^ { + } ] , b _ { 2 } ^ { - } ] = n B _ { n } ^ { - } .And the model’s output:
[ [ B _ { n } ^ { + } , b _ { 2 } ^ { - } ] , b _ { 2 } ^ { + } ] = n B _ { n } ^ { + } , \quad [ [ B _ { n } ^ { - } , b _ { 2 } ^ { + } ] , b _ { 2 } ^ { + } ] = n B _ { n } ^ { - } .<|eot|>The format now matches the target. One line, space-separated tokens, no display-math wrapper or commentary, and a clean stop at <|eot|>. That’s the output contract the base model ignored.
The content is almost right but still missed a minute detail. It successfully captures the macro-level LaTeX target format; it hasn’t yet learned fine-grained symbol recognition, resulting in the expressions being wrong.

In mathematical representations, precision is binary: a single symbol mistake invalidates the entire equation.
After 30 steps, the model has done the best it can. You can do full fine-tuning by replacing max_steps = 30 with num_train_epochs = 1.
Once the numbers hold up, it’s time to package the adapter.
Save and export
The adapters are the only thing training changed, so saving them writes a few hundred MB instead of 56 GB:
# Local saving
model.save_pretrained("muse_glimmer_lora")
processor.save_pretrained("muse_glimmer_lora")

# Hugging Face Hub saving
model.push_to_hub("your_name/muse_glimmer_lora", private = True)
processor.push_to_hub("your_name/muse_glimmer_lora", private = True)
Streamlit UI
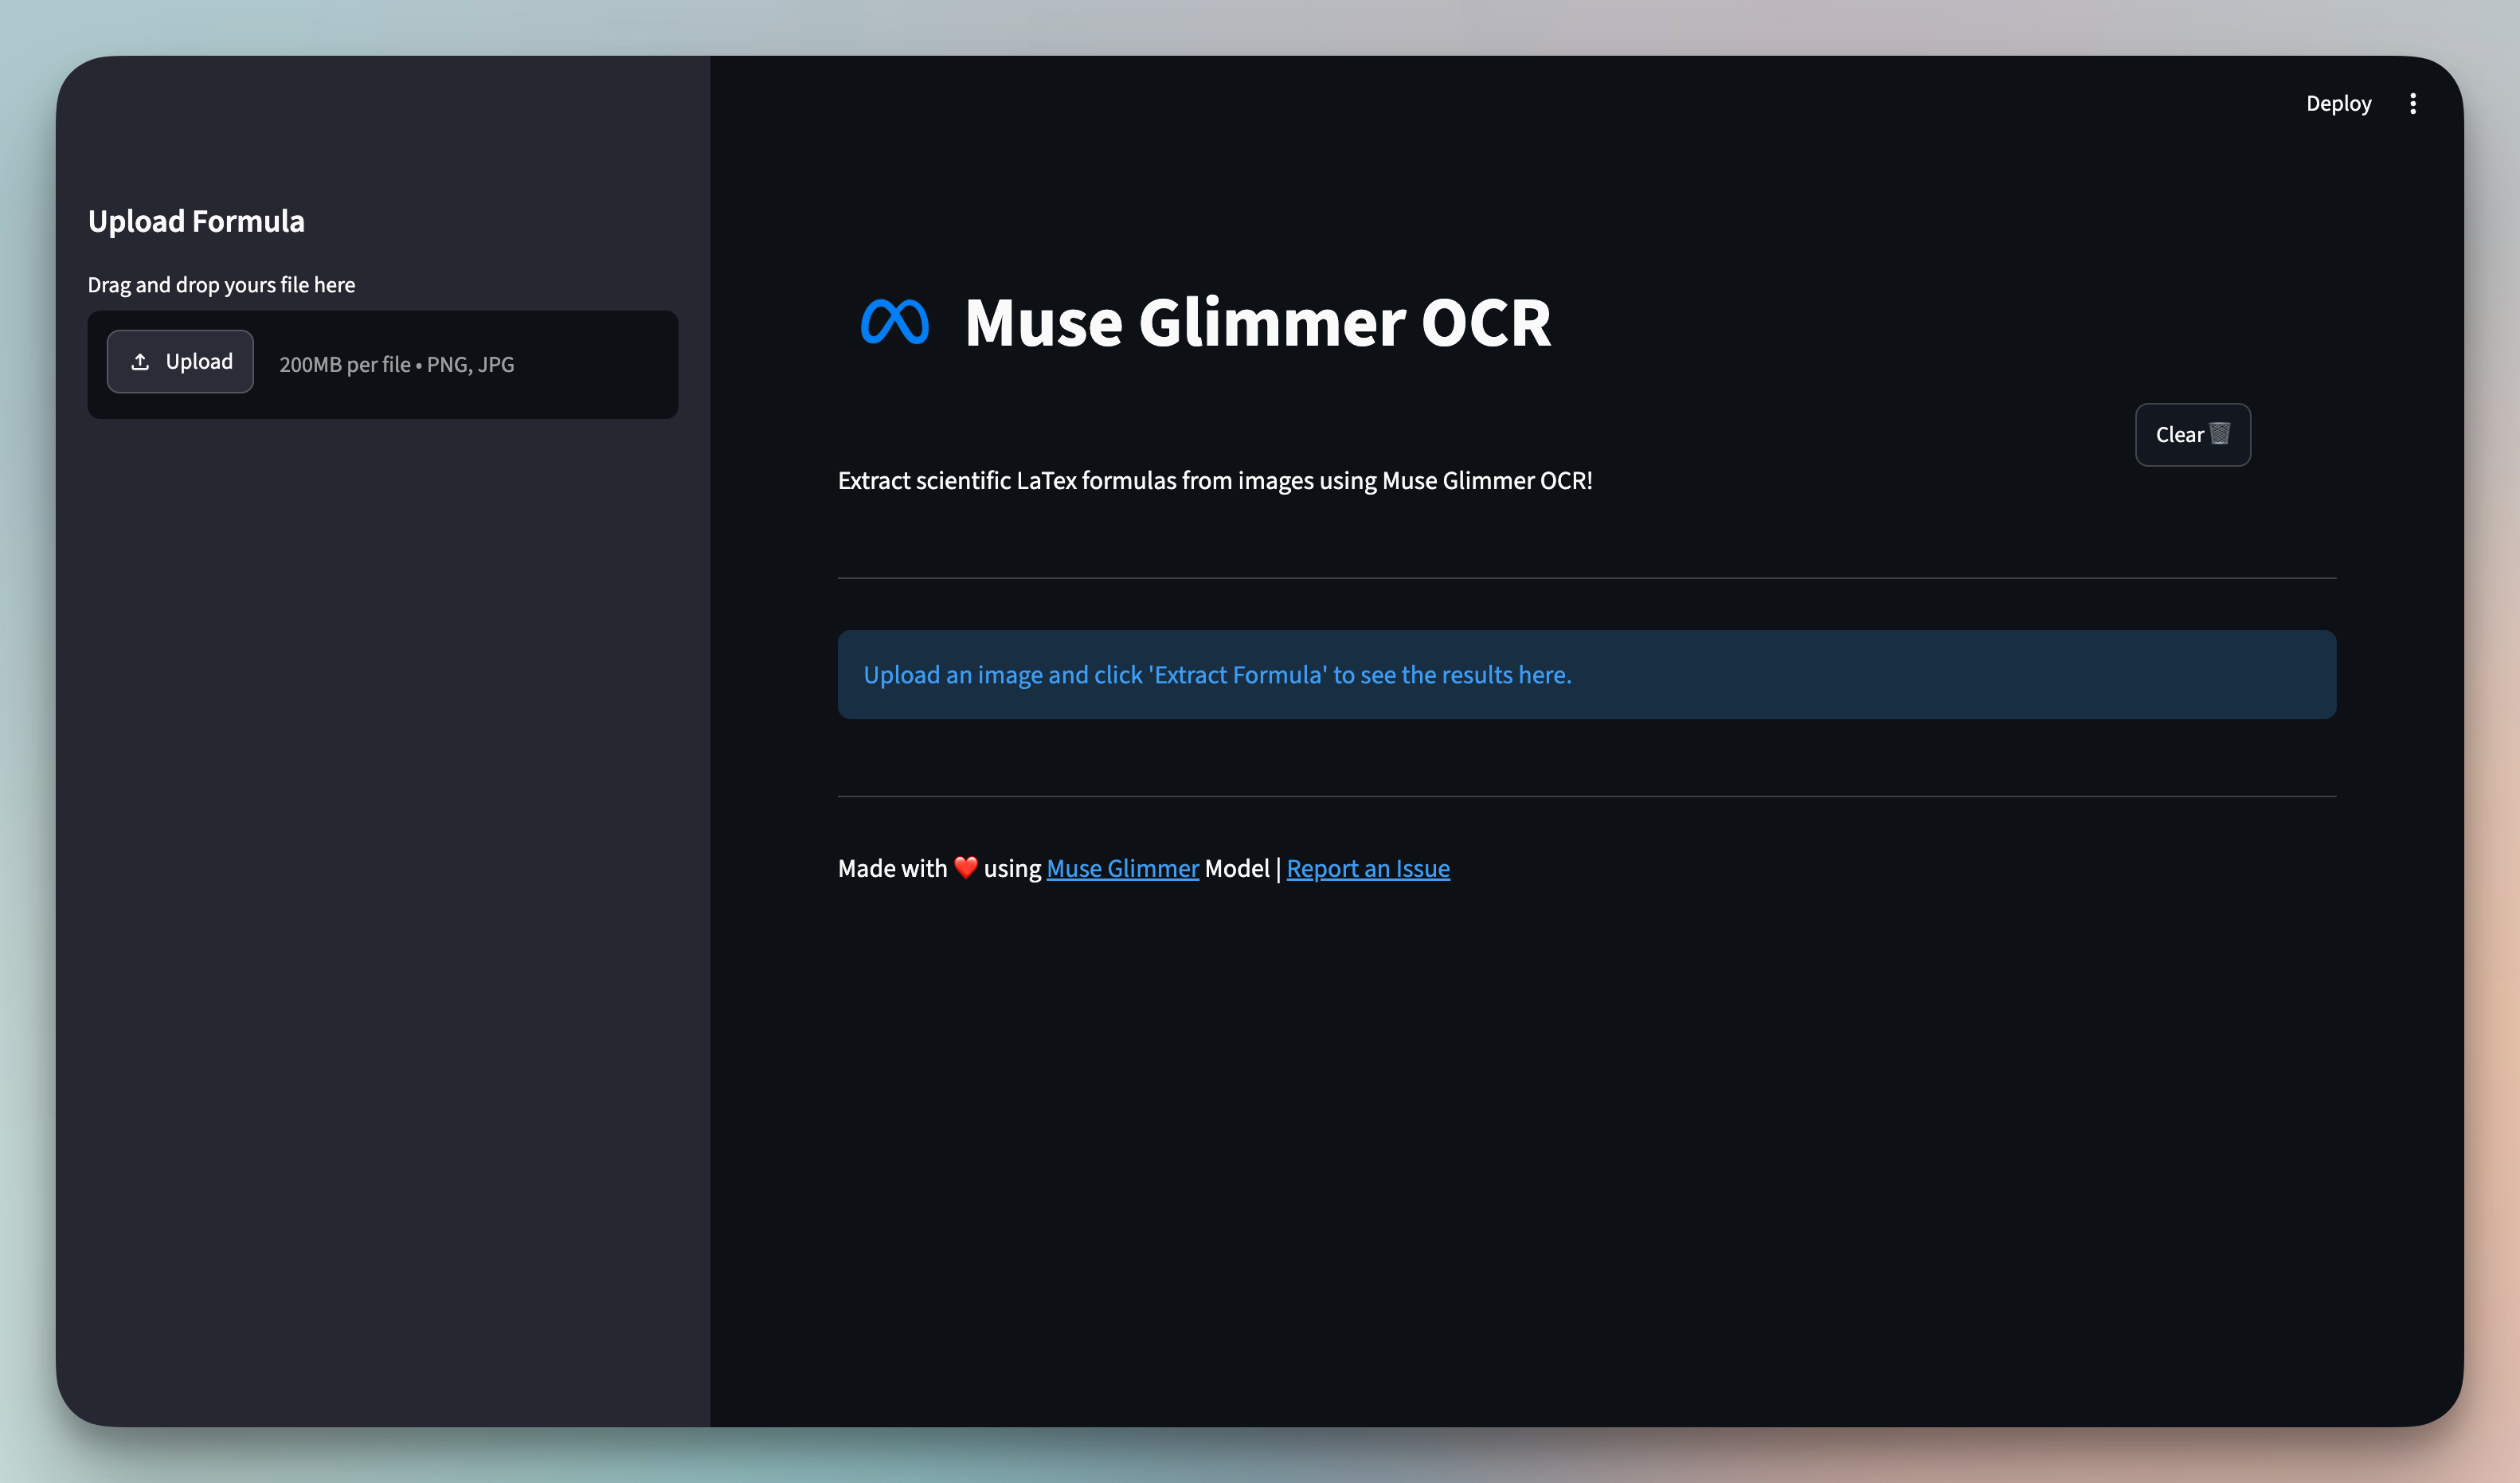
A small Streamlit app wraps the fine-tuned model. Upload a formula image and get LaTeX back, rendered on the page.
Wrapping up
Here’s the full workflow end-to-end:
Load: a 30B model in 4-bit
Adapt: LoRA on 0.44% of the parameters
Format: image and text conversations in ATEM
Tune: read the chat template and set the reasoning strength
Train: baseline first, then train for max steps or a full epoch
Ship: LoRA adapter for local inference
This setup isn't limited to vision fine-tuning, e.g., OCR. Unsloth also supports conversational fine-tuning and GRPO reinforcement learning.
Muse Glimmer is not just another open model; it is a 30B agentic model featuring a controllable reasoning channel. Released under the Apache 2.0 license, it can be trained on consumer GPUs, redefining what “local” means for agentic workloads.
And the difference between a model that simply reads your data and one that responds according to your system's needs comes down to a few hundred lines of setup and a single training run.
You can find the code and replicate this fine-tuning workflow on the LightningAI Studio.
Good day!
The baseline failure is more interesting than the memory tricks. The model reads the integral and the fraction, then still fails an exact-match check because it wraps the LaTeX, answers twice, and spaces tokens differently from the dataset. That means a lot of the fine-tune is teaching an output contract, not vision. You set finetune_vision_layers to true, so the encoder gets gradients too. Did the exact-match gain mostly come from the decoder learning the format, or did the vision layers actually move on misreads like zeta versus chi?
The base model getting the integral right and then wrapping it in display math is the real lesson here. Half of what the LoRA buys is the output contract, so I'd score format errors and symbol errors separately to see which one training actually fixed.