

In today’s newsletter:
A technical LLM interview question.
Grok Bot Masterclass.
6 types of contexts for Agents.
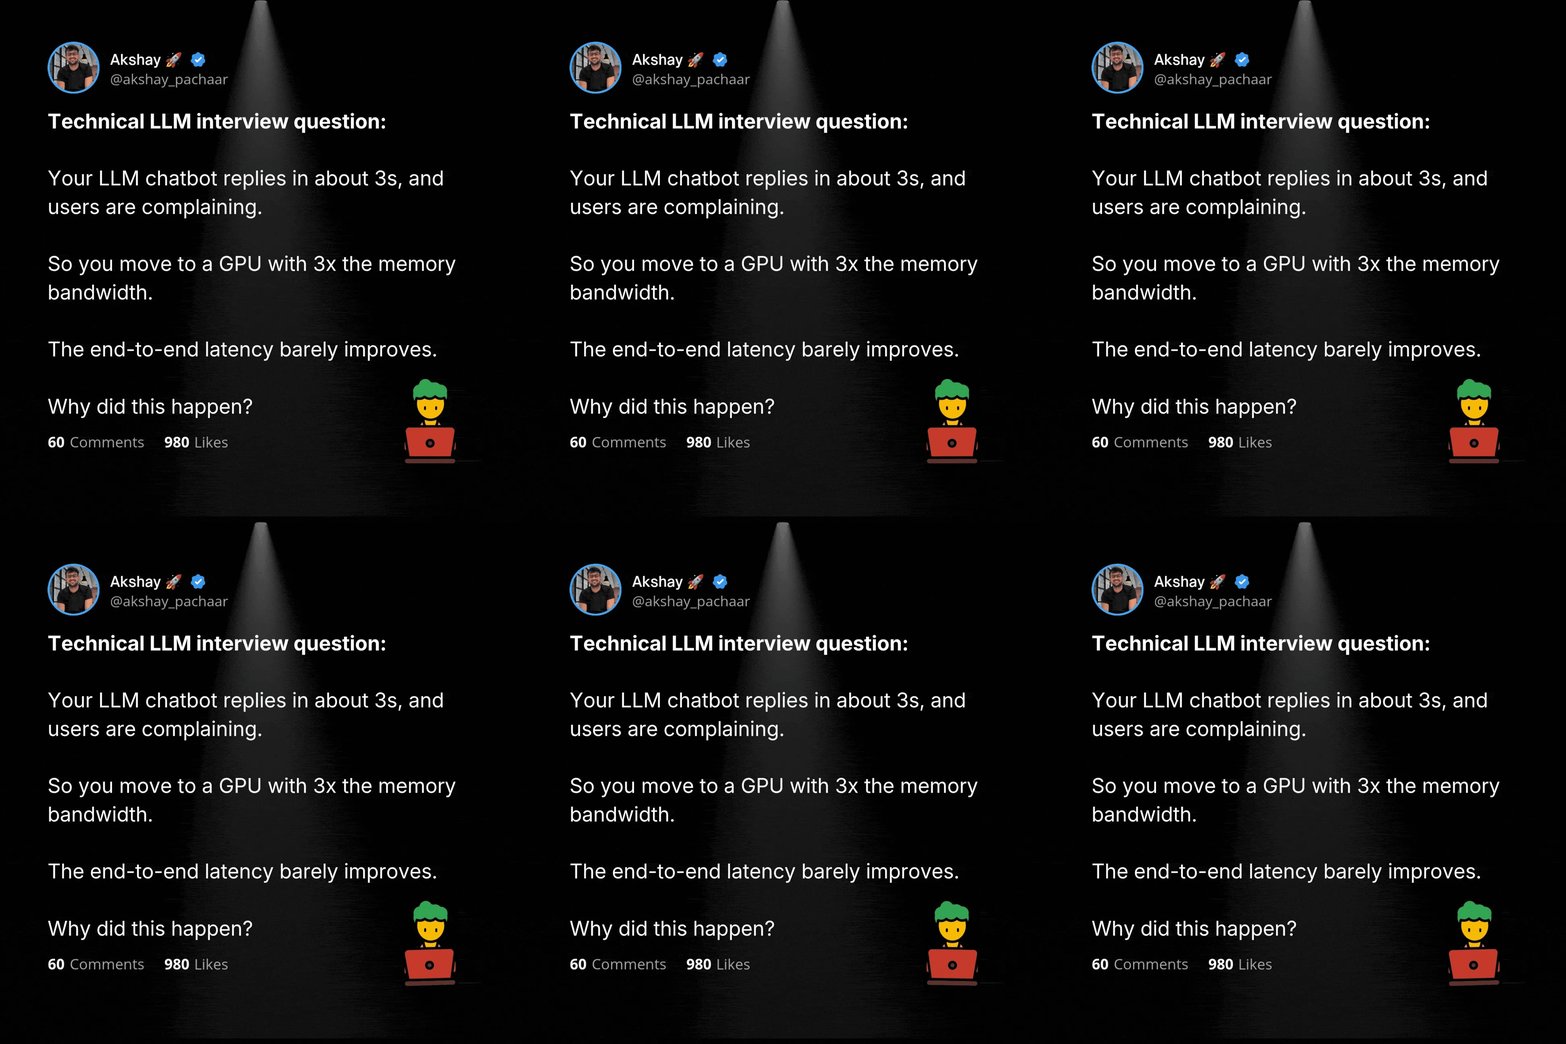
A technical LLM interview question:
Your LLM chatbot replies to a query in about 3 seconds, and users are complaining.
So you move the model onto a GPU with 3x the memory bandwidth.
The end-to-end latency barely improves.
Why did this happen?
Continue reading to learn more:
Latency in an LLM app is a placement problem disguised as a model problem.
If you profile the 3 seconds, the model itself may usually account for around 400ms of it.
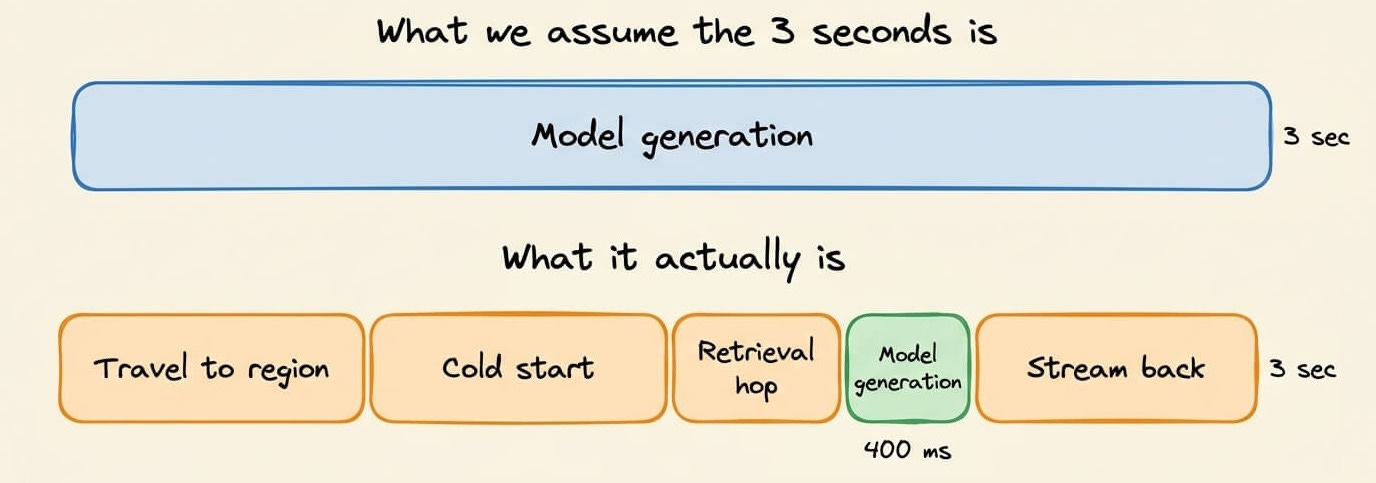
So doubling the generation saves just 200ms out of 3000, which is under 7%.
The rest is spread across stages that never touch the GPU.
The request first travels to whatever region the app runs in, and a cross-continent round trip costs a few hundred milliseconds before any code executes.
Then the request handler starts. On a container-based serverless platform, this adds another 100 to 500 ms of cold start, paid before auth, rate limiting, or prompt assembly even begins.
Retrieval adds its own hop, and the response streams back across the same distance.
Optimizing a stage that was already fast cannot alter the latency that’s majorly affected by other stages.
Those other stages are slow for a structural reason.
An LLM app runs two workloads that want opposite machines.
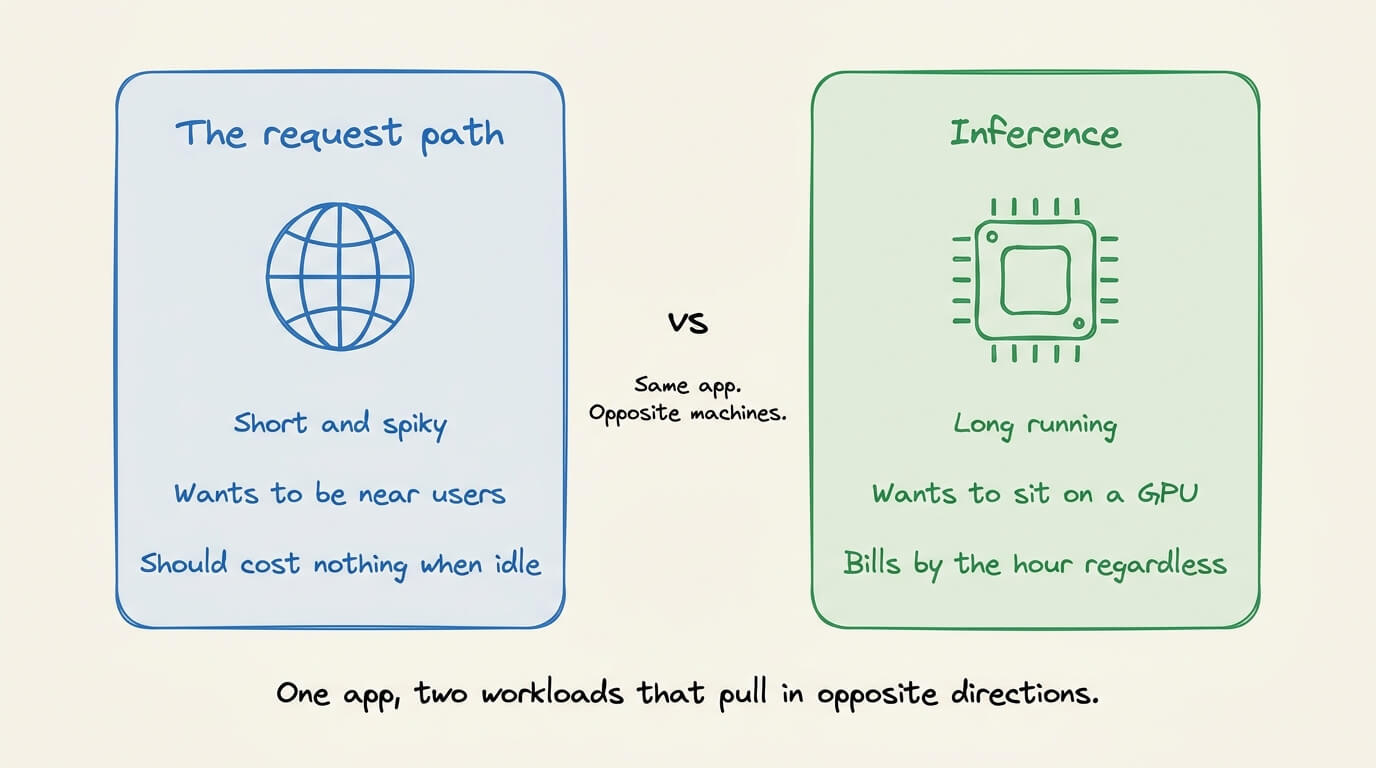
The request path is short, spiky, and needs to sit close to users
Inference is long-running, GPU-bound, and billed hourly, whether requests arrive or not.
So the actual decision is not which model to run, but where each of these two workloads runs.
There are three options, each with its own tradeoffs:
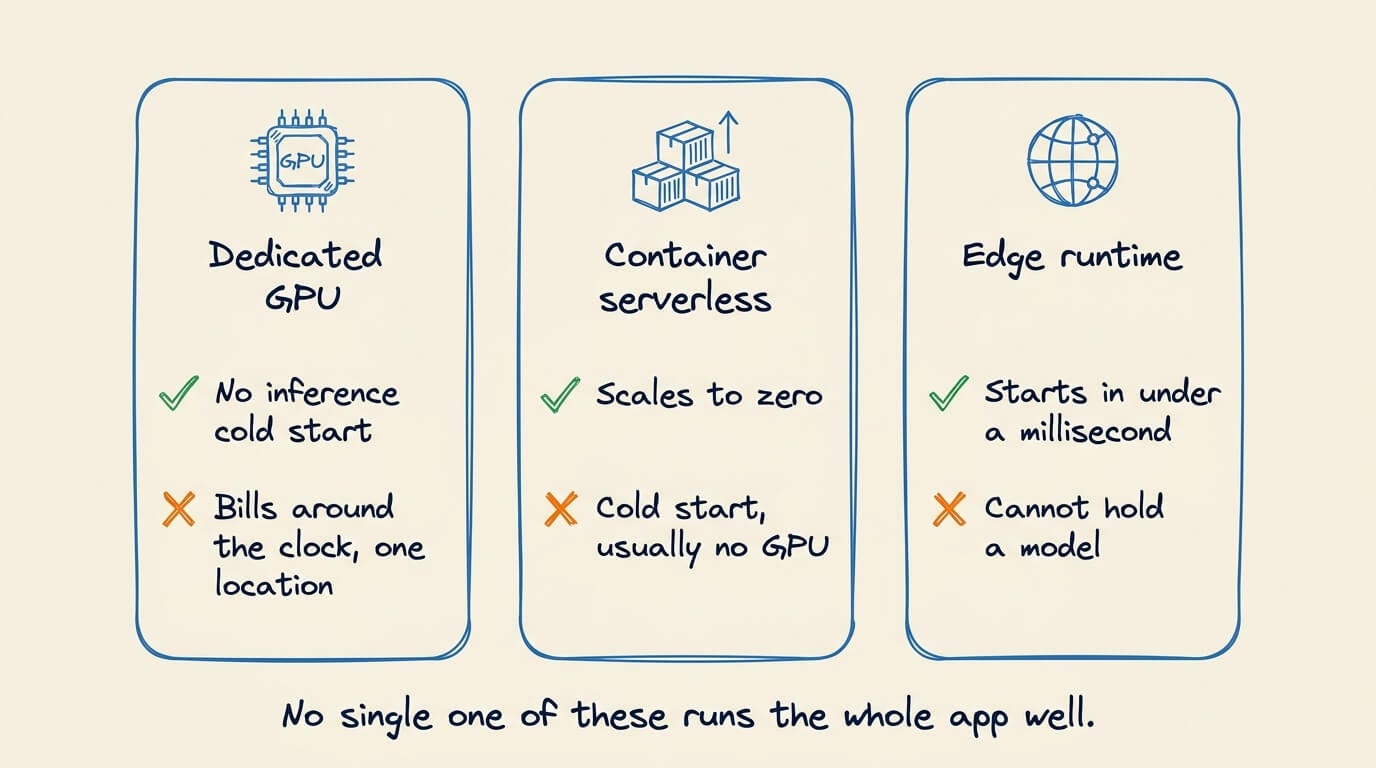
> A dedicated GPU box removes inference cold starts, but it bills around the clock and lives in one location, so distant users wait out the round trip on every request
> Container-based serverless scales to zero, but the request path pays a cold start, and most of these platforms have no GPU behind them.
> Edge runtimes start in under a millisecond, because a WebAssembly module carries no OS or container image to boot. They handle the request path well and cannot hold a model.
So the answer is not to pick one, but to split the app across two of them.
The request path runs close to users, and inference runs on a dedicated GPU it calls into.
That also explains the failed upgrade. More memory bandwidth made a stage that was already fast faster, and left the 2.6 seconds around it untouched.
To actually learn how it’s done in practice, Akamai’s GitHub has a reference implementation for each half:
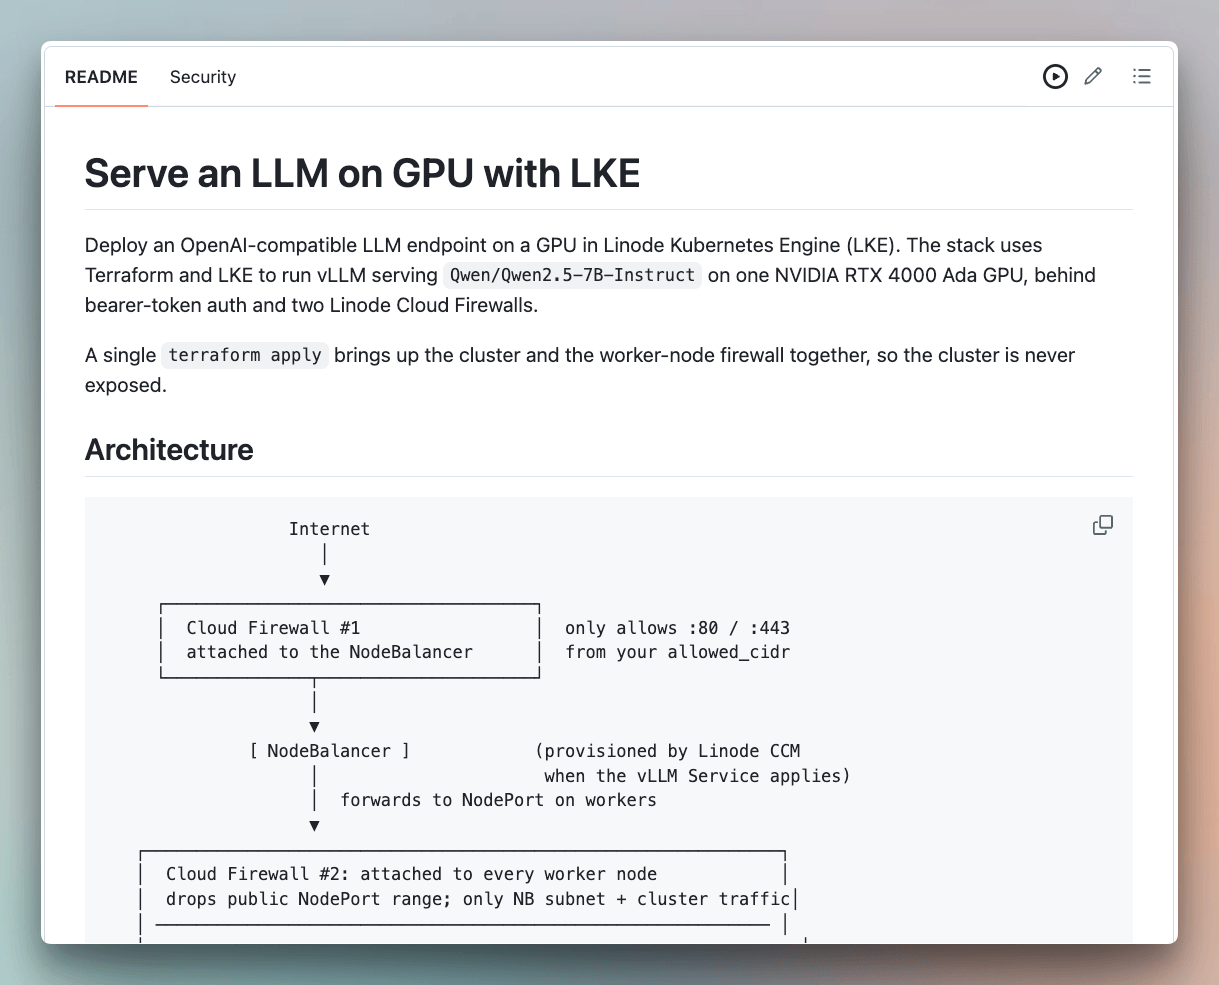
vllm-on-lke serves Qwen2.5-7B-Instruct behind an OpenAI-compatible endpoint on one RTX 4000 Ada GPU in Linode Kubernetes Engine, with Terraform creating the cluster, both firewalls, and the GPU operator in one apply.
akamai-functions-llm-chatbot covers the front, where a WebAssembly API checks a KV cache and only calls the GPU-backed instance on a miss.
Both are available on Akamai’s new Developer Hub, alongside several production-grade tutorials and code samples.
It also links to Edge Case, their Discord, where four developer advocates architect and deploy a production app live every other Wednesday.
If you create a new Akamai Cloud account, you can also get $300 in credits for joining.
Join here: developers.akamai.com
Thanks to Akamai for partnering today!
Grok Bot Masterclass
There is a habit that spread quietly among people running AI agents this year. They leave the laptop lid half-open so the agent can keep working. When they close it, the run dies.
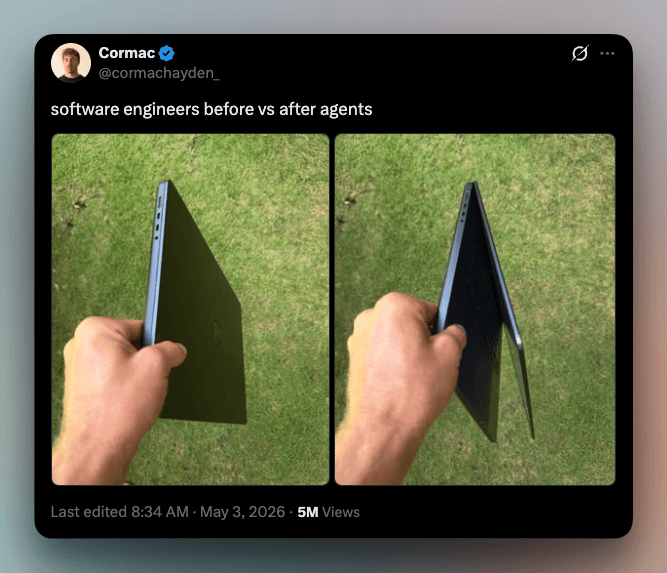
That habit belongs to agents that run on your own machine. The hosted ones solved the lid problem long ago, and over the past year they have been solving the memory problem too, in pieces.
For instance:
Devin restores a saved machine snapshot at the start of every session, so anything you did not commit or capture is gone.
Manus puts its sandbox to sleep between tasks and recycles it after enough inactivity, with an always-on cloud computer available.
ChatGPT Work keeps browser cookies, so once you sign in to a site through the takeover flow, later runs pick it up.
Each of those persists one thing, for one agent, usually scoped to a session or a project. You still get a machine per task, and the roster of agents does not share anything.
SpaceXAI launched Grok Bot last week. Instead of a machine per task, you get a machine per person. It stays on, it is tied to your account, and the whole roster of Bots shares it.
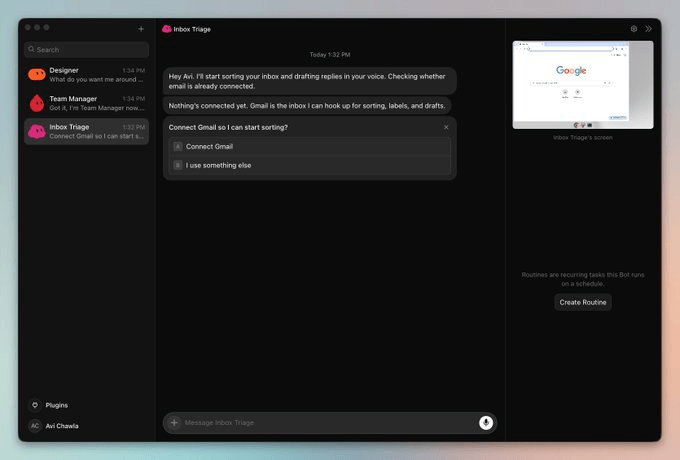
This guide covers what a Bot actually is, how the system is put together underneath, how it compares to Hermes Agent and the other options, how to set it up on macOS, and which roles are worth building first.
By the end, you will have a working roster on your own machine, a saved skill, and a routine that runs while your laptop is closed.
Let’s begin!
Due to a size limit, the email has been cut off. You can read the full Grok Bot masterclass issue on our website here →
What Grok Bot is
The one-line version is that a Bot is a named teammate you message, and the actual computing happens one layer below it.
The word “bot” suggests a separate program running somewhere. It is closer to a saved role with its own memory, sitting on a machine it shares with every other role you create.
A Bot is defined by three things you write:
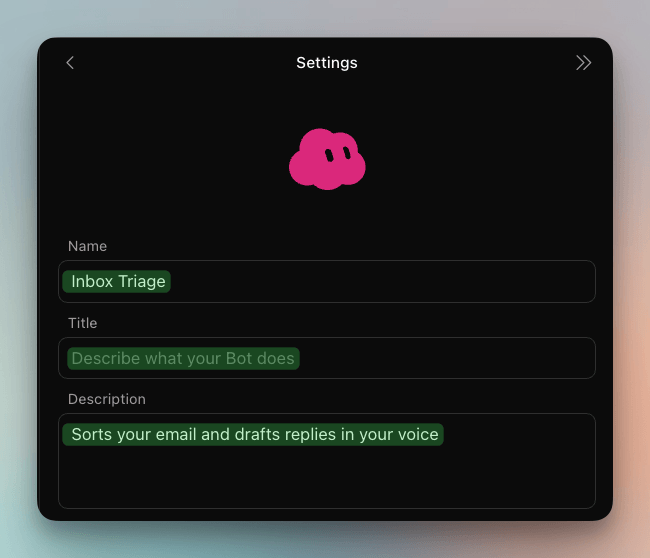
A short name
One primary job
And a description of how it should work.
In exchange, you get a persistent conversation thread, and the Bot keeps working context across turns.
As per the official docs, a Bot retains stable working preferences, important facts, and summaries from its work. It does not replay every prior message.
The computer is the other half. Every Bot on your account uses one persistent cloud computer with a browser, a filesystem, and a terminal. It is assigned to your user account, not to any individual Bot.
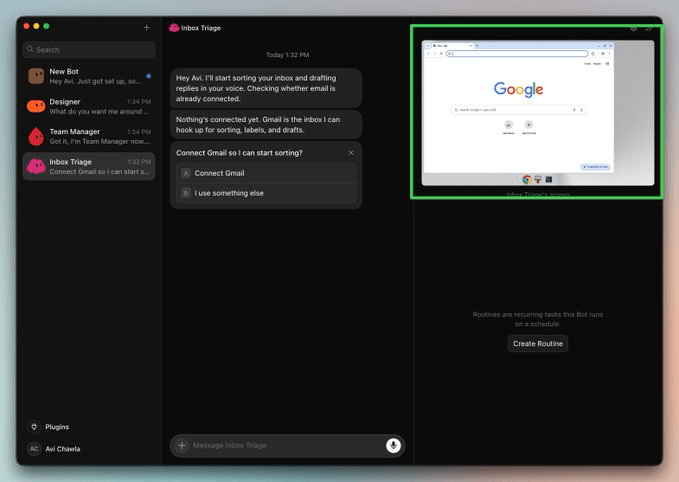
Each Bot gets its own screen on that shared machine. Several Bots can therefore drive browser and desktop tools at the same time, though one Bot runs one computer-use task on its screen at a time
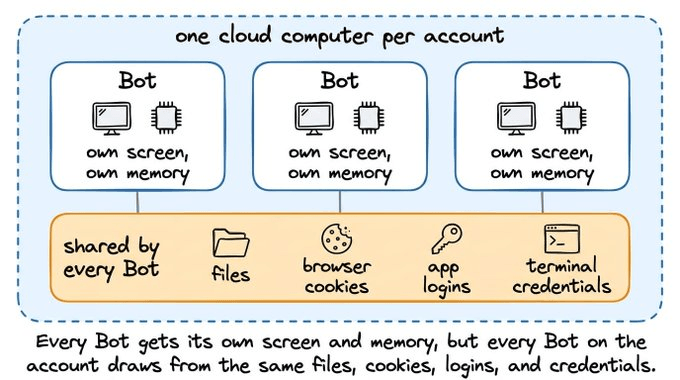
In the docs and in the app, a Bot means one persistent named agent. It is not a separate machine, a separate container, or a separate model instance.
As a useful analogy, you can relate it to an office setting.
The cloud computer is the office, and each Bot is a coworker with their own desk. There are different people, jobs, and notebooks, but one filing cabinet and one set of keys.
That analogy also explains the trade-off, which we will return to in detail. Shared keys make handoffs free. They also mean the roster shares one set of consequences.
In summary, a Bot is a role plus a memory plus a thread. The machine underneath is singular, persistent, and shared.
How it is built
Before the setup, let’s look at how all the pieces fit together.
Specifically, there are five parts you should know about Grok Bot:
The persistent cloud computer
The computer runs in SpaceXAI’s cloud, not on your Mac. So closing the app or the laptop does not stop a background turn or a scheduled routine.
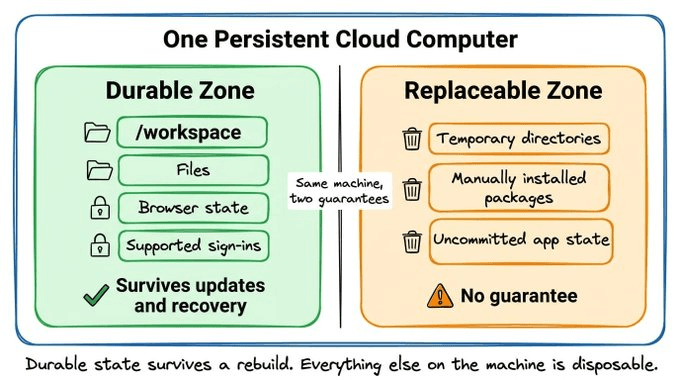
There’s a durability contract, which means that there is a shared workspace at /workspace, and files, browser state, and supported sign-ins are designed to survive normal computer updates and recovery.
Everything else is explicitly replaceable. Temporary directories, manually installed packages, and uncommitted application state carry no guarantee. Durable project files belong in the shared workspace.
SpaceXAI has not published the operating system, the image contents, or the machine specification. One widely shared report from a user who inspected the environment describes Debian with roughly eight virtual CPUs, around sixteen gigabytes of memory, and a disk in the hundred-gigabyte range, with no GPU.
The sharing model
As mentioned above, every Bot on your account uses the same computer, and the docs enumerate exactly what that means.
Browser cookies and signed-in sessions are shared. Files are visible to every Bot. Command-line credentials are shared. One Bot can continue from work another Bot saved.
This means that a research Bot can save a file, and a writing Bot picks it up with no upload or additional login. The handoff costs nothing because nothing has to be re-established.
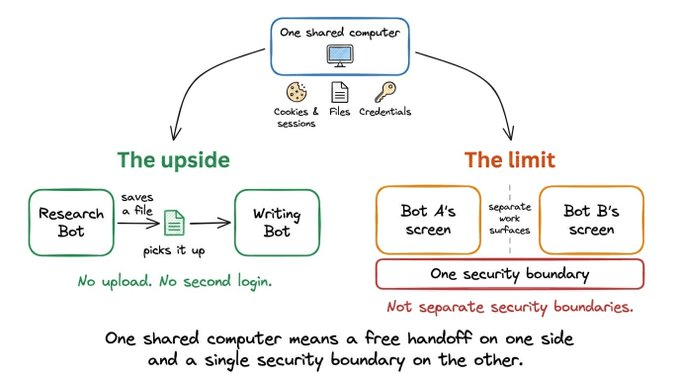
Under this shared setting, you should not place a credential or a file on the computer if another Bot on your account should not use it.
The action layer
Grok Bot has two ways to interact with a service.
A connector gives a Bot a structured path into a supported service. Connectors appear as Plugins in the current app, and they are account-wide rather than per Bot.
The browser handles everything else like vendor portals, ad managers, older internal tools, anything without a clean programmatic interface.
Ideally, prefer a connector when one is available, because it is often more reliable than clicking through a website.
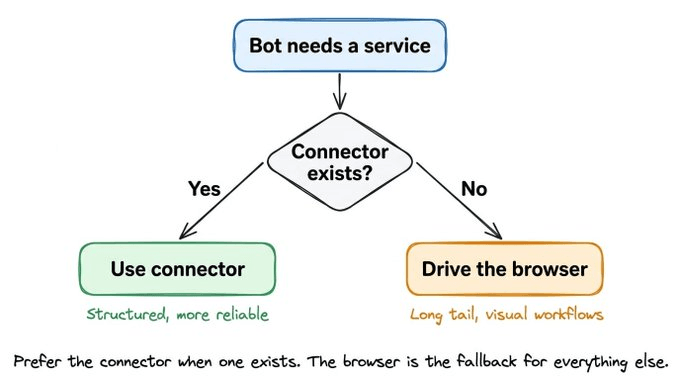
Since programmatic coverage of business software can be limited, it falls back to pixel-level control, which also means that it inherits every fragility of the underlying site.
So a layout change, a new consent prompt, or a session timeout can break a workflow that ran fine earlier.
Authentication and the takeover flow
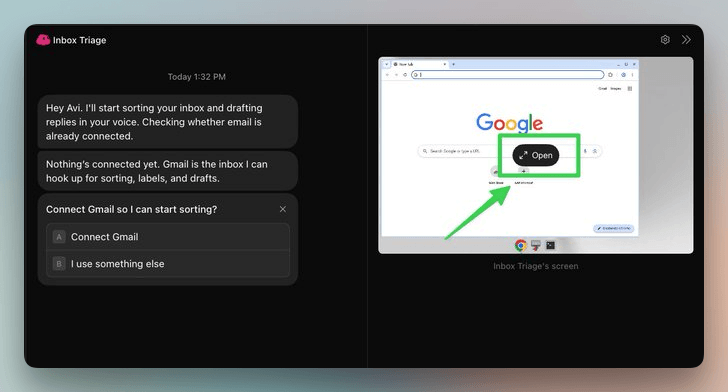
Sessions persist on the shared browser, so you usually do not sign in again for each task. Signing in once for one Bot makes that session available to your other Bots.
For anything sensitive, the Bot hands you the machine, like in case of passwords, passkeys, two-factor codes, CAPTCHAs, payment or identity checks, and sites that explicitly require a human.
Practically, you open the Agent Computer, take control, complete only the blocked step, return control, and tell the Bot to continue.
For supported connections, there is a secure secret request instead. The value is masked, excluded from the transcript, and not shown to the model.
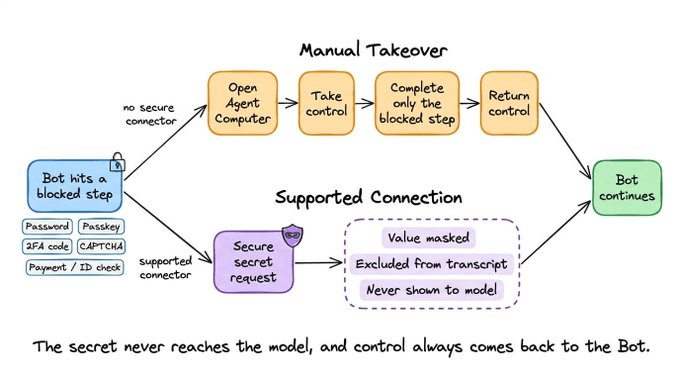
Never paste a password or a one-time code into ordinary chat. The takeover flow exists precisely so those values stay out of the transcript.
Agent Memory
Memory is maintained per Bot.
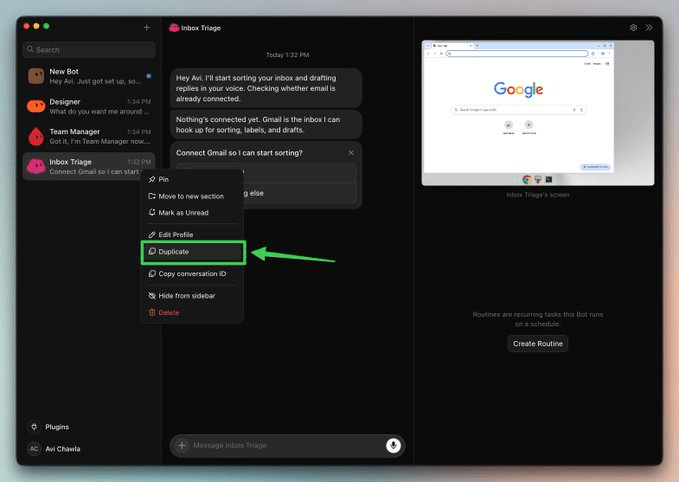
Duplicating a Bot copies its profile, settings, enabled skills, routines, and avatar, but not its conversation history or learned memory.
Read the rest of the issue here →
6 types of contexts for Agents
A poor LLM can possibly work with an appropriate context, but even a SOTA LLM can never make up for an incomplete context.
That is why production-grade LLM apps don’t just need instructions but rather structure, which is the full ecosystem of context that defines their reasoning, memory, and decision loops.
And all advanced agent architectures now treat context as a multi-dimensional design layer, not a line in a prompt.
Here’s the mental model to use when you think about the types of contexts for Agents:
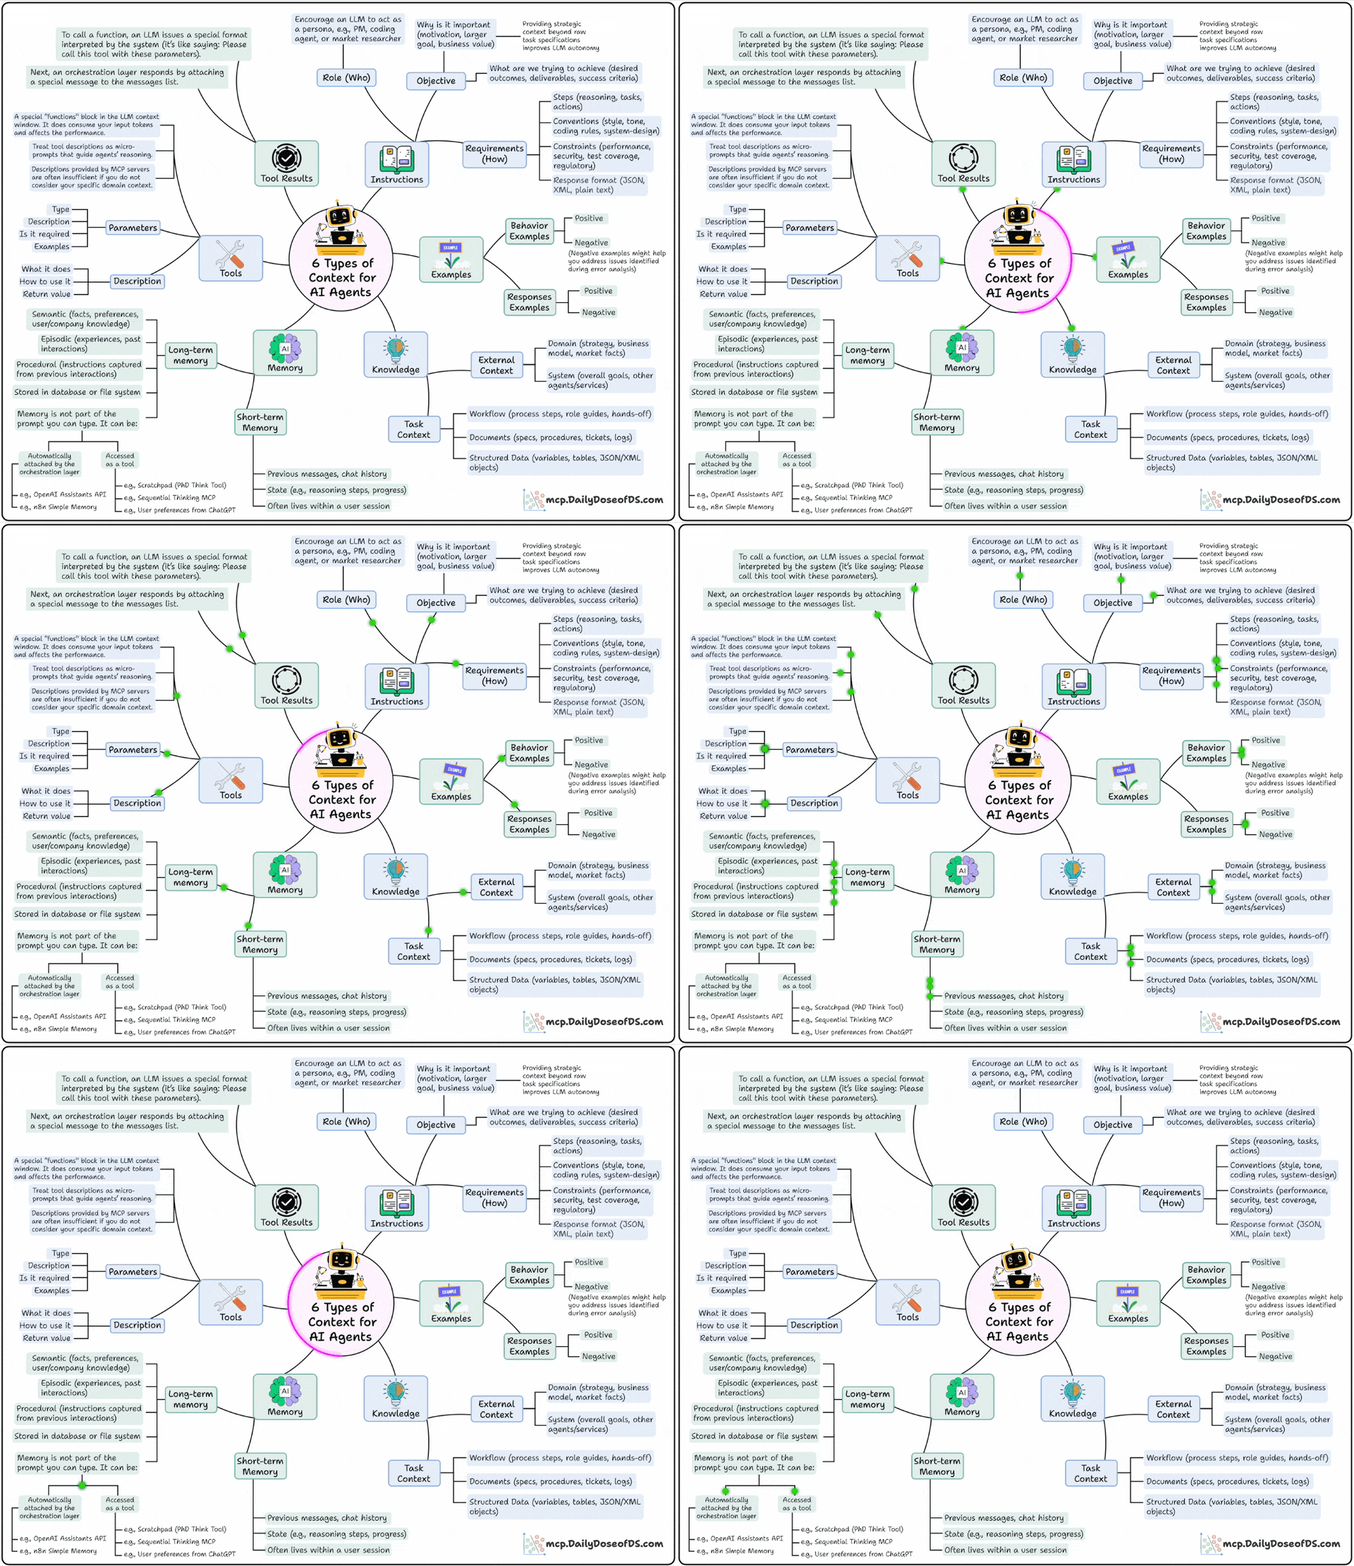
Instructions: This defines the who, why, and how:
Who’s the agent? (PM, researcher, coding assistant)
Why is it acting? (goal, motivation, outcome)
How should it behave? (steps, tone, format, constraints)
Examples: This shows what good and bad look like:
This includes behavioral demos, structured examples, or even anti-patterns.
Models learn patterns much better than plain rules
Knowledge: This is where you feed it domain knowledge.
From business processes and APIs to data models and workflows
This bridges the gap between text prediction and decision-making
Memory: You want your Agent to remember what it did in the past. This layer gives it continuity across sessions.
Short-term: current reasoning steps, chat history
Long-term: facts, company knowledge, user preferences
Tools: This layer extends the Agent’s power beyond language and takes real-world action.
Each tool has parameters, inputs, and examples.
The design here decides how well your agent uses external APIs.
Tool Results: This layer feeds the tool’s results back to the model to enable self-correction, adaptation, and dynamic decision-making.
These are the exact six layers that help you build fully context-aware Agents.
Btw, this is exactly how systems like Claude Code, real-world agents, and effective memory tools are already working today.
Context engineering is becoming the core skill for anyone building long-horizon, multi-step agents.
We did a crash course to help you implement reliable Agentic systems, understand the underlying challenges, and develop expertise in building Agentic apps on LLMs, which every industry cares about now.
Here’s everything we did in the crash course (with implementation):
In Part 1, we covered the fundamentals of Agentic systems, understanding how AI agents act autonomously to perform tasks.
In Part 2, we extended Agent capabilities by integrating custom tools, using structured outputs, and we also built modular Crews.
In Part 3, we focused on Flows, learning about state management, flow control, and integrating a Crew into a Flow.
In Part 4, we extended these concepts into real-world multi-agent, multi-crew Flow projects.
In Part 5 and Part 6, we moved into advanced techniques that make AI agents more robust, dynamic, and adaptable, like Guardrails, Async execution, Callbacks, Human-in-the-loop, Multimodal Agents, and more.
In Part 8 and Part 9, we primarily focused on 5 types of Memory for AI agents, which help agents “remember” and utilize past information.
In Part 10, we implemented the ReAct pattern from scratch.
In Part 11, we implemented the Planning pattern from scratch.
In Part 12, we implemented the Multi-agent pattern from scratch.
In Part 13 and Part 14, we covered 10 practical steps to improve Agentic systems.
In Part 15, Part 16, and Part 17, we covered practical ways to optimize the Agent’s memory in production use cases.
Of course, if you have never worked with LLMs, that’s okay. We cover everything in a practical and beginner-friendly way.
👉 Over to you: Have we missed any context layer in this?
Good day!