
uv Cheatsheet and Hands-on Guide for Python Devs
...explained with step-by-step code.

In today's newsletter:
Integrate Coding Agents into your workflows.
uv cheatsheet and hands-on guide for Python devs.
Accelerate tSNE with GPU.
Full global attention vs alternating attention
Integrate Coding Agents into your workflows
Using the Codegen SDK, you can now programmatically interact with your AI Coding Agents:
You can use it to:
Assign tasks like implementing features, fixing bugs, writing tests, or improving documentation to the agent.
Trigger agent tasks from your CI/CD pipelines, scripts, or other development tools.
Supply the agent with specific instructions, relevant code snippets, or background information to ensure it performs tasks according to your requirements.
Essentially, the SDK allows you to leverage Codegen’s AI capabilities wherever you can run Python code.
Here's the documentation to learn more →
uv cheatsheet and hands-on guide for Python devs
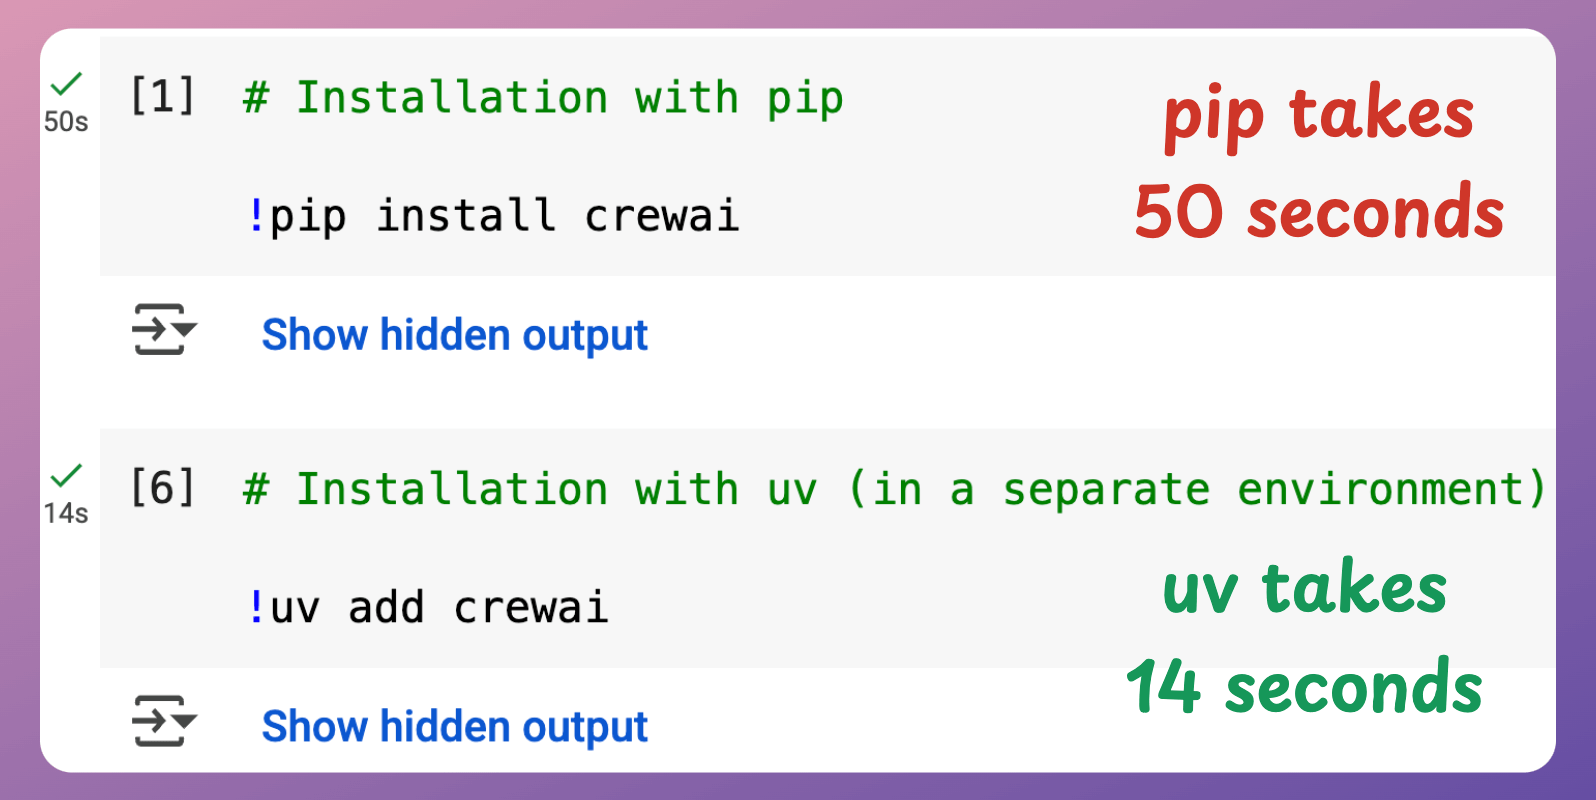
uv is incredibly fast.
Creating virtual envs. using
uvis ~80x faster thanpython -m venv.Package installation is 4–12x faster without caching, and ~100x with caching:
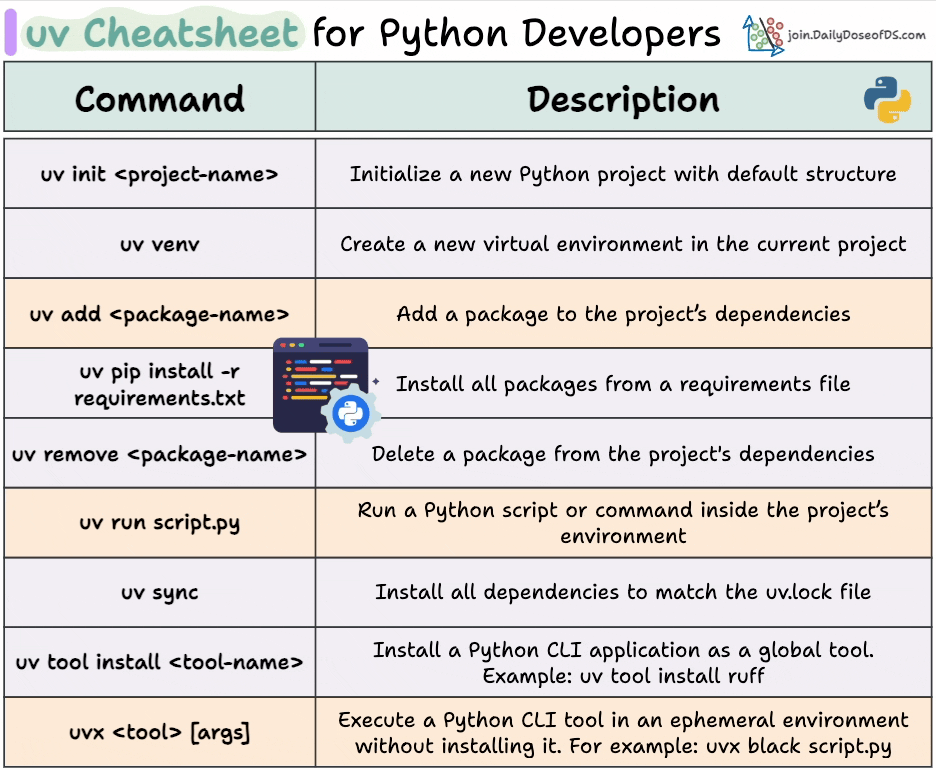
Here’s a uv cheatsheet we prepared with the most important commands:
Today, let’s understand package management using uv.
We have added a Colab notebook with step-by-step instructions for your practice.
For starters, uv is a modern, Rust-based Python package manager built to be fast and reliable. It replaces not just pip but also pip-tools, virtualenv, pipx, poetry, and pyenv, all with a single standalone binary.
Let’s walk through a quick demo!
Firstly, install uv (you can also use wget):

To set up a new Python project, run: uv init project-name. This creates a directory structure, pyproject.toml, sample script and a README:

Next, move to the above project directory: cd project-name.
Although uv automatically initializes a virtual env. in a project, we can explicitly create a virtual env. with:

Moving on, activate the virtual env. as follows:
MacOS/Linux:
source .venv/bin/activateWindows:
.venv\Scripts\activate
Next, you can add dependencies using uv add <library-name>:

When you add packages, uv updates the pyproject.toml and resolves the full dependency tree, generating a lockfile.
To execute a script, run:

One good thing about this is that if a package is not available in your environment but it is used in the script, uv will automatically install it when you run the script, provided the dependencies are specified in pyproject.toml.
Finally, uv gives fully reproducible installs via lockfiles. Say you cloned a project that used uv. You can run uv sync command to create a local env. that precisely matches the project:
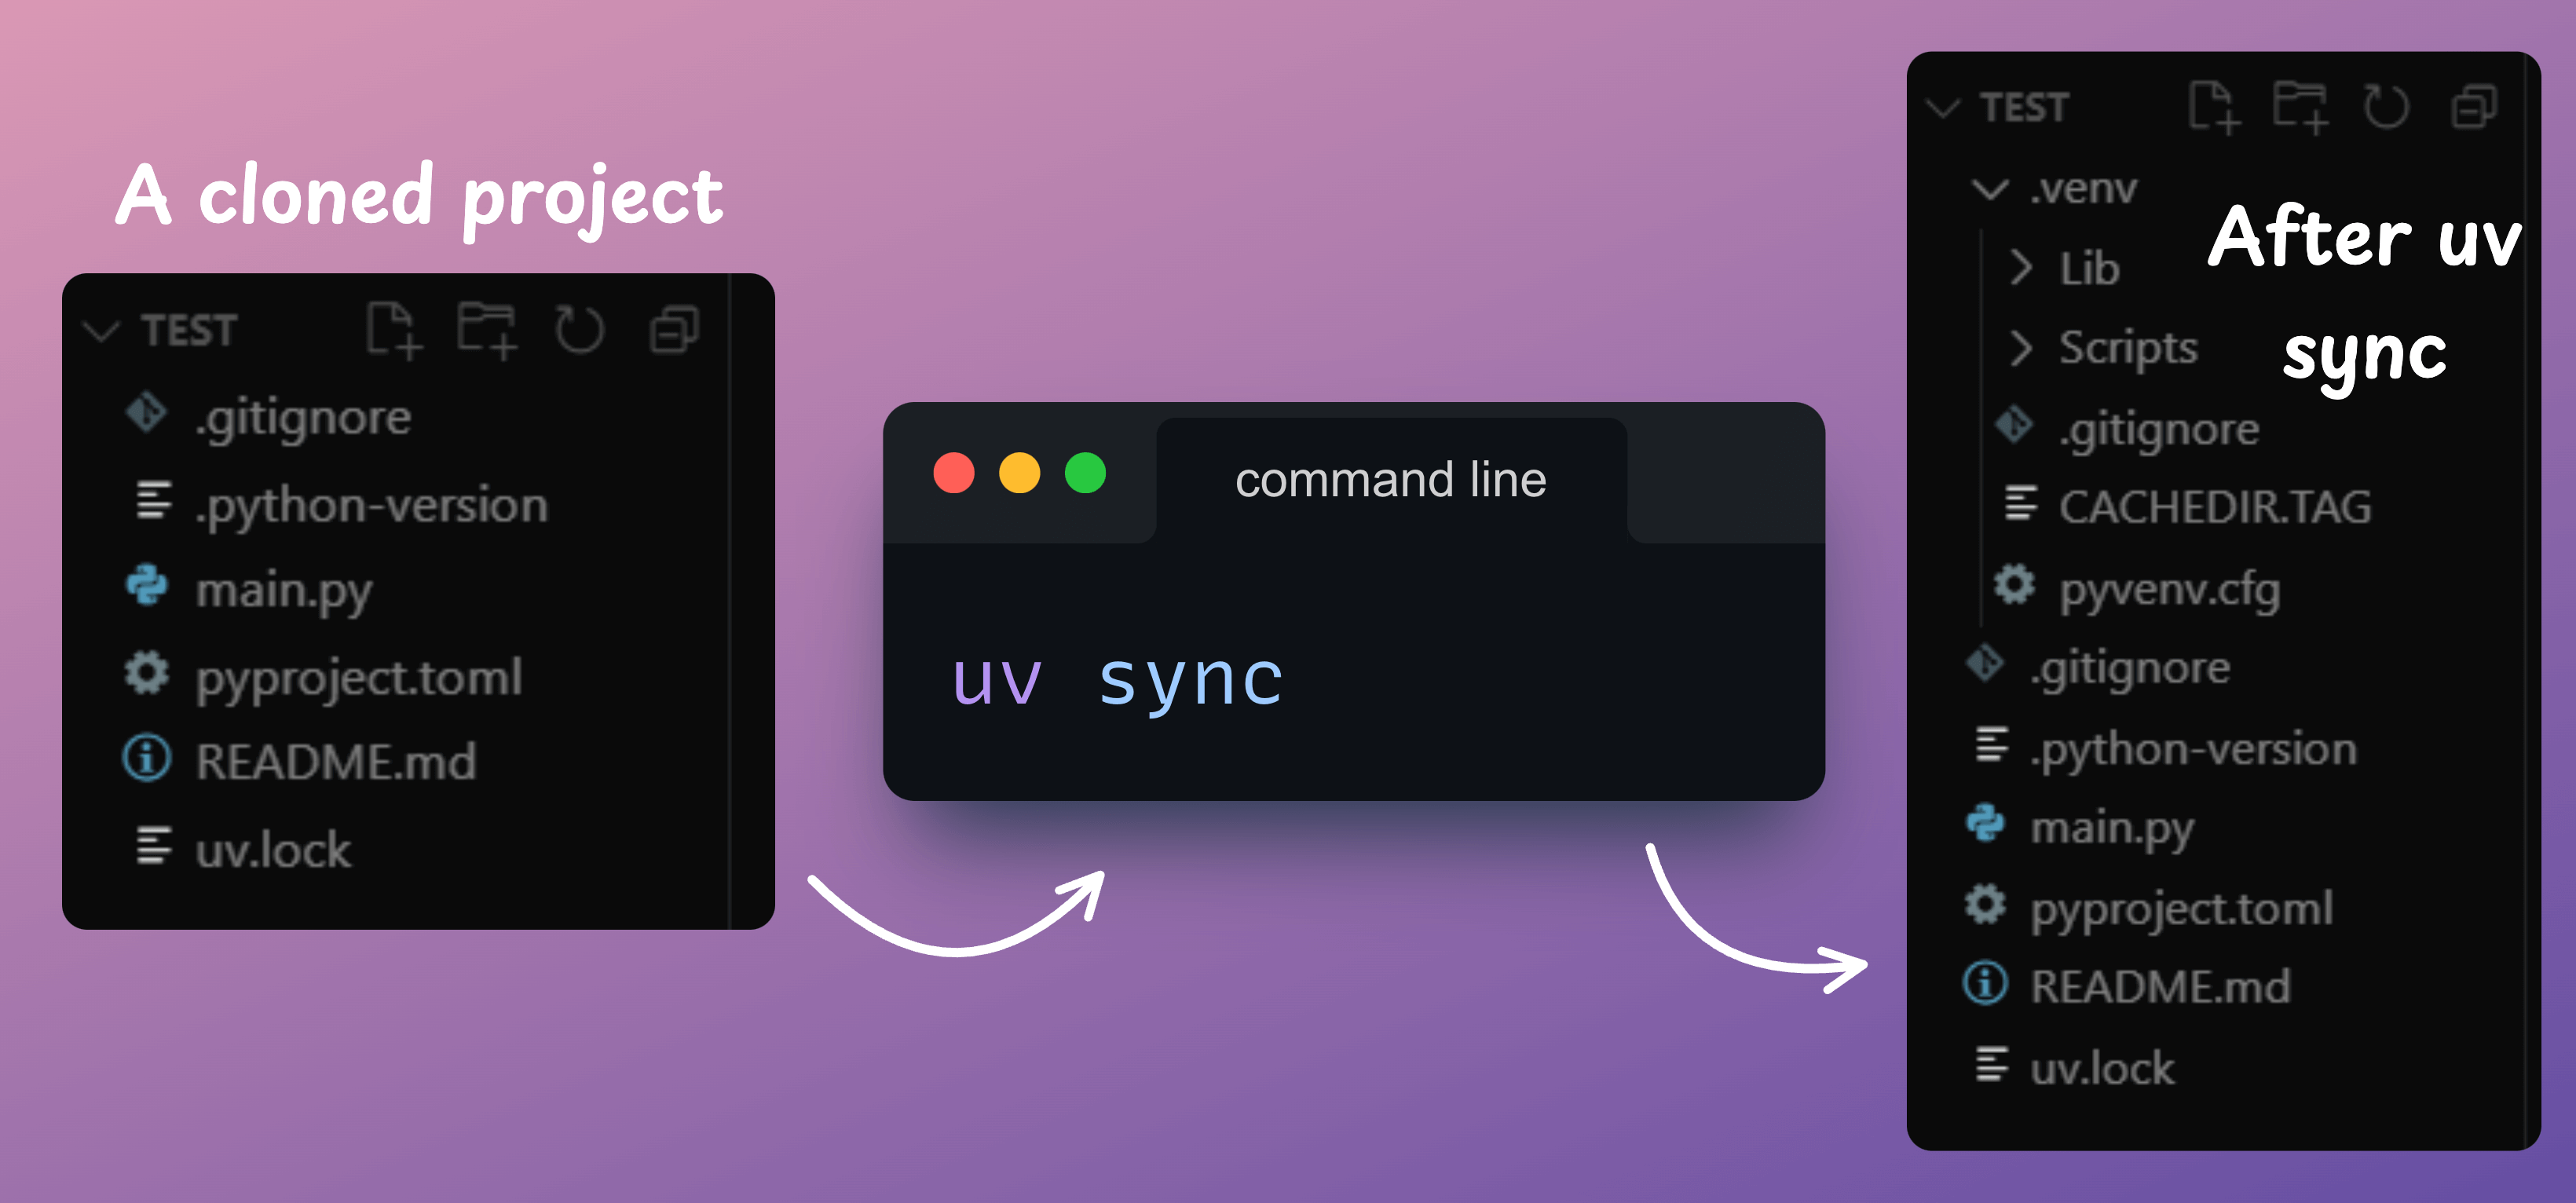
Whether you're on Windows, macOS, or Linux, uv sync ensures your environment matches exactly. If a project requires a different Python version, uv can fetch and use it automatically.
We have fully moved to uv for our projects due to the problems it solves around dependency management + the speed benefits.
While the adoption is still low, it’s quickly maturing, and the benefits are hard to ignore. We highly recommend moving to uv if you are a Python developer.
You can use our Colab Notebook with step-by-step instructions here →
Here is the cheatsheet again for your reference:

👉 Over to you: Have you tried uv yet?
Accelerate tSNE with GPU
The run-time of t-SNE is quadratically related to the number of data points.
Thus, it becomes difficult to use t-SNE from Sklearn implementations when your data has over 40k+ data points.
tSNE-CUDA is an optimized CUDA version of the tSNE algorithm. Thus, it provides immense speedups over the standard Sklearn implementation:

As depicted above, the GPU-accelerated implementation is 33 times faster than the Sklearn implementation.
That said, this implementation only supports n_components=2, i.e., you can only project to two dimensions.
The authors do not intend to support more dimensions since this will require significant changes to the code.
But in my opinion, the support for more dimensions doesn’t matter because tSNE is used to generate 2D projections in 99% of the use cases.
These are the benchmarking results by the authors:

It depicts that on the CIFAR-10 training set (50k images), tSNE-CUDA is 700x Faster than Sklearn.
Further reading:
This was just about tSNE, you can accelerate other ML algorithms with GPUs. Read this to learn more: Sklearn Models are Not Deployment Friendly! Supercharge Them With Tensor Computations.
Also, do you know how t-SNE works end-to-end? Read this to learn more: Formulating and Implementing the t-SNE Algorithm From Scratch.
Full global attention vs alternating attention
ModernBERT is an upgraded version of BERT with:
16x larger sequence length.
Much better downstream performance, both for classification tasks and retrieval (like used in RAG systems).
The most memory-efficient encoder.
Here's an interesting detail related to the attention network in ModernBERT:
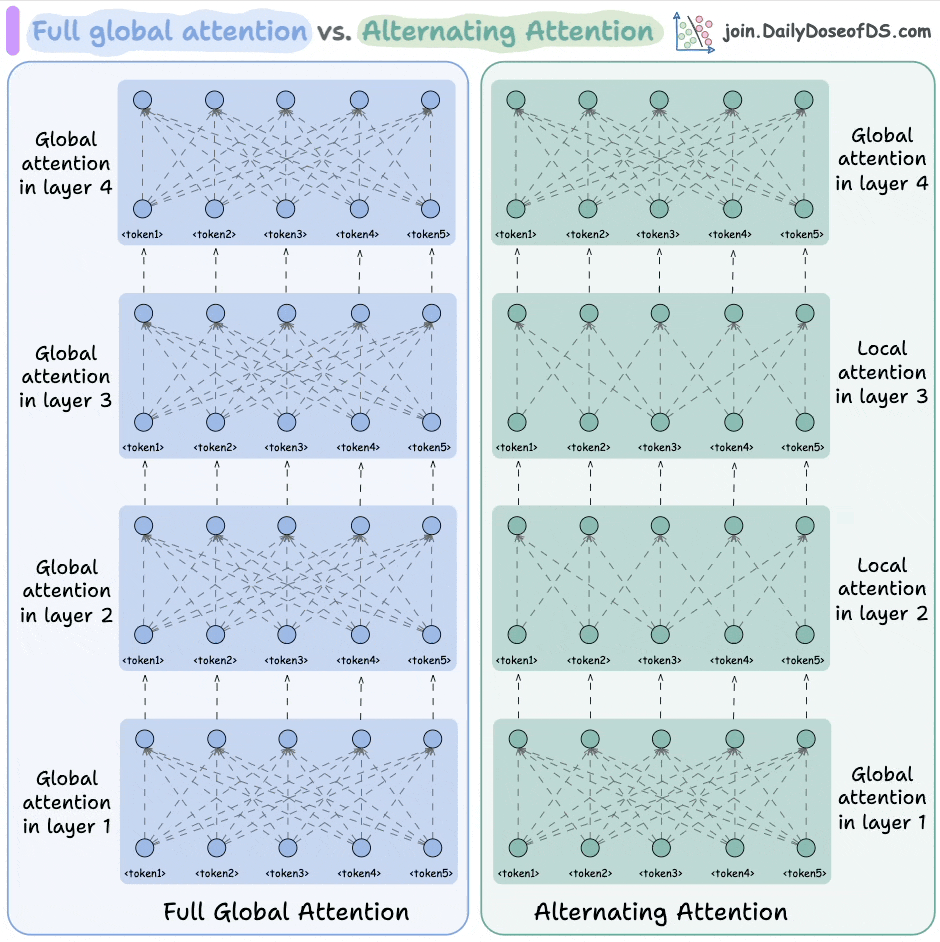
BERT used full global attention (shown on the left above), which has a quadratic complexity. ModernBERT made this efficient with alternating attention.
Here's the idea:
They used full global attention in every third layer.
All other layers used a sliding window attention, wherein, every token only attended to 128 nearest tokens (called local attention).
This allows ModernBERT to process much longer input sequences, while also being significantly faster than other encoder models. Here's an intuitive explanation (taken directly from the announcement):
Conceptually, the reason this works is pretty simple: Picture yourself reading a book. For every sentence you read, do you need to be fully aware of the entire plot to understand most of it (full global attention)? Or is awareness of the current chapter enough (local attention), as long as you occasionally think back on its significance to the main plot (global attention)? In the vast majority of cases, it’s the latter.
Makes sense, doesn't it?
Thanks for reading!